EMnify now supports configurable DNS settings for IoT device groups

10.12.2020
guide-image

At EMnify, a security-first approach is the foundation of the development of our platform features. This is reflected in our solutions which enable TLS on A2P SMS, the integration of your IoT devices with your VPC via Cloud Connect, and multiple software and physical measures undertaken to prevent SIM misuse. The addition of configurable DNS settings for device groups allows for end-to-end control of the networking settings of your devices. Aside from providing further options for using alternative public DNS services, device fleets can now be restricted to use private DNS services which do not expose DNS query logs or internal server IPs, and may be configured to drop internet access for hardened security-first IoT infrastructure.

Background on DNS

Domain Name System (DNS) is a naming system and directory for computers connected to the Internet. Machines are assigned unique IP addresses so that other machines can communicate back and forth reliably. When internet users browse online, the domain names requested (emnify.com or even firmware-update.example.com) need to be translated to the IP addresses used by the hosting servers so that a browser or client can retrieve the relevant data. DNS performs this translation of the text-based domain names to the machine or server IP address so that users do not have to memorize numeric IPs. For this reason, DNS is commonly referred to as 'the phonebook of the Internet'.

Enhanced security with a private DNS service

The main advantage of a private DNS service for an IoT fleet is that devices will not be able to resolve IP addresses for any public domain names. If DNS lookup is simply dropped for non-approved or public domains, IoT devices cannot request malicious resources and already-infected devices would typically be rendered useless for use in a DDoS attack. Incidentally, this can also prevent unintentional data consumption in cases where misconfigured devices request the wrong resources.

If a customer application server communicates often with IoT devices, it might not be desirable to add the IP address of this internal service to public DNS servers. Poorly-maintained DNS servers are occasionally vulnerable to a method known as cache poisoning where cached records are altered to point to an IP address an attacker controls. If we consider the danger this poses with domains such as firmware-update.example.com, a private DNS service can provide data integrity by ensuring that IoT devices receive authentic software upgrades via the correct update server. The private DNS server becomes the only authoritative server capable of responding to the update site domain name in this case.

For customers who already have infrastructure deployed to a cloud provider, the DNS services like Route 53 on AWS, for example, can be configured so that only devices within your VPC can use it for private DNS resolution. Using EMnify's CloudConnect, the DNS service of your cloud provider will only respond to queries from IoT devices when they originate from within a VPC that is authorized. EMnify supports attaching the VPC of your IoT devices with your existing VPC via CloudConnect on AWS, Google Cloud Platform, and Azure.

Configure DNS settings for EMnify IoT devices

EMnify now supports setting custom DNS configurations in Service Profiles which allows groups of devices to use the specified DNS configuration. Users can add primary and secondary nameservers via the EMnify API with UI components to follow soon.

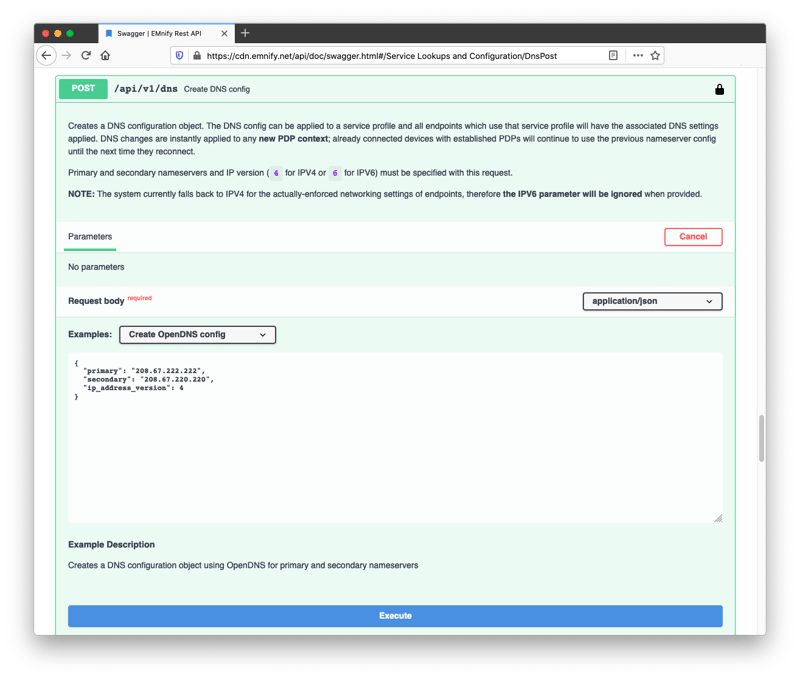
A POST request to /api/v1/dns will create a new DNS config:

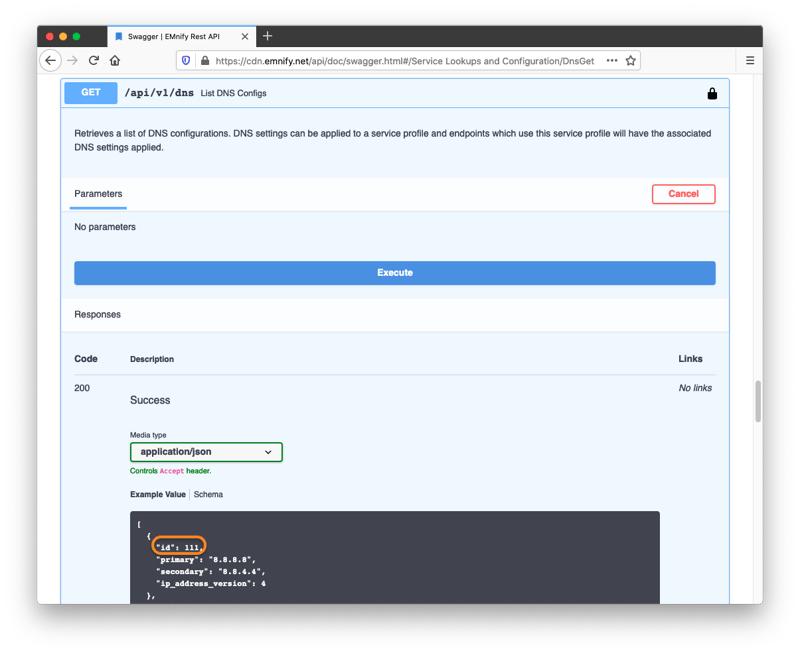
The DNS configurations can then be listed via a GET request to /api/v1/dns.

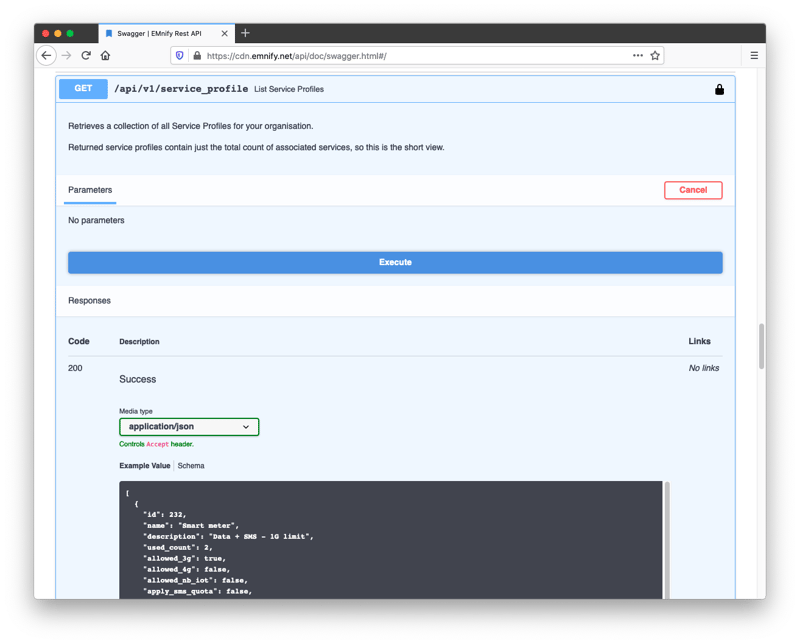
The IDs of these DNS objects are added to existing or new Service Profiles. To list existing Service Profiles, perform a GET to /api/v1/service_profiles and copy the id of the profile you would like to update:

Paste the numeric profile ID into the parameter for the PATCH /api/v1/service_profile, select one of the example DNS settings (or provide your own), and click execute:
Swagger Documentation for Service Profile Patching

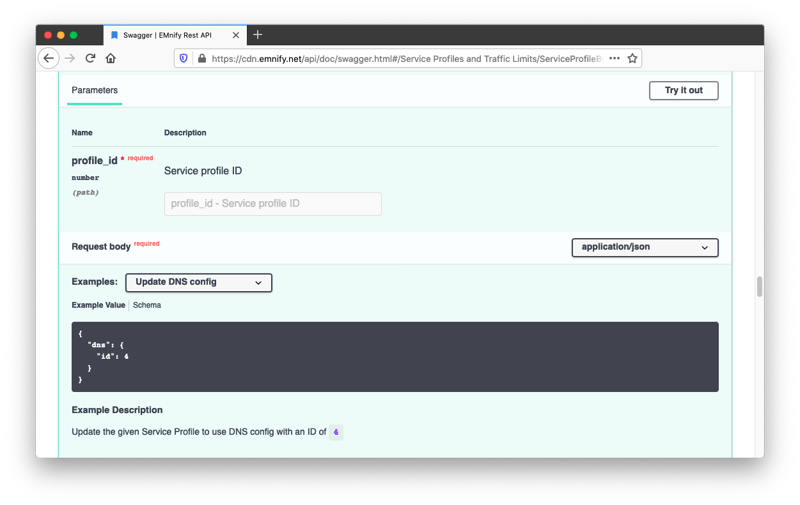
The networking settings of IoT devices using this Service Profile will be updated on their next data connection to use the new DNS configuration. The Swagger documentation provides public DNS servers known for their resilience and quality of service in the examples:

OpenDNS is one of the largest free providers claiming 100% uptime and malicious content filtering enabled by default.

Cloudflare offers low latency of requests without logging IP addresses and consistently come out on top as the fastest DNS provider on the market.

Google Public DNS  used for reliability and speed, offering full IP logs for 48 hours on their platform.

Comodo Secure DNS provided by a security firm with advanced options for filtering malicious content on the DNS level.

Summary

With the addition of DNS configuration via Service Profiles, users can quickly configure the networking settings of device groups in bulk.

Private DNS benefits:

  • Enable the use of internal domain names
  • Manage the lookup of domain names to restrict access to the public Internet
  • Troubleshoot networking errors on the DNS level
  • Add better stability and reliability to DNS
  • Reduce attack surface of your infrastructure by keeping DNS lookup internal

Custom DNS with CloudConnect and IPsec benefits:

  • Private DNS services as a managed service by cloud providers which are not accessible over the public internet
  • Full control of domain resolution per service with additional logging
  • Device networking has lower latency and is fully internal to a VPC - IoT devices reside on the same networks as DNS and application servers

More details on the setup of DNS configuration can be found in the EMnify KnowledgeBase article for DNS configs.


What can your connectivity provider do for your device security? 

Check out our Guide for Cellular IoT Securityfor 25+ best practices
to ensure a secure IoT solutionfor your business.

New call-to-action

Related Posts

Image for post LwM2M vs MQTT: Which one is the best for IoT Solutions?

LwM2M vs MQTT: Which one is the best for IoT Solutions?

While building IoT solutions, keeping the footprint small is of utmost importance. This requirement influences all design aspects of IoT solutions, including communication. Transferring data from your IoT devices to your application servers efficiently is important, but at the same time, you also need to have a lightweight way of doing so. In this post, I will compare MQTT and LwM2M communication protocols for IoT solutions. What are Communication Protocols? Simply put, communication protocols are rules that define how two connected systems communicate with each other. These protocols cover everything from authentication, signalling, security, data transfer, flow control to error detection and handling. The Internet of Things drives innovation in these protocols to make them more efficient and secure among other things. What is MQTT? MQTT stands for MQ Telemetry Transport where the MQ part comes from an IBM product called the MQ Series. MQTT is a protocol that was specifically built for M2M and IoT message transfer by Andy Stanford-Clark (IBM) and Arlen Nipper (Arcom). The protocol helps transfer messages using the publish and subscribe model which enables it to send messages to one or multiple subscribers. What is LwM2M? LwM2M stands for Light Weight M2M. It is a protocol designed by OMA SpecWork’s for device management but is also suitable for data transfer with the objective of attaining reduced power and data consumption. It is built on top of CoAP (Constrained Application Protocol) which increases its bandwidth efficiency. LwM2M has a transport agnostic design which by default uses UDP, but also supports TCP and SMS. Architecture MQTT As mentioned, MQTT has a publisher and subscriber model. There is no direct connection between the sender of the message and the receiver. There are 2 basic components in this architecture. Client Broker Clients can publish messages on topics to the broker. The broker then dispatches these messages to any clients that subscribe to that topic. Thus the broker decouples the publisher and the subscriber. MQTT brokers do not normally store messages, but do offer buffering of messages in some cases. MQTT uses TCP/IP to connect to the broker. The broker authenticates and authorizes the clients and maintains the session data of all active clients. The broker is responsible for receiving all messages, filtering the messages, determining who is subscribed to each message, and sending the message to these subscribed clients. LwM2M In an attempt to standardize device management and telemetry, LwM2M supports device management functions, in addition to data reporting (as MQTT does). Bootstrapping Device Configuration Firmware Update Fault Management Configuration & Control Reporting For all the above functions there are procedures defined, e.g. how the device registers at the server, or how the server initiates a client diagnosis. The common structure under all the above functions is a client - server model. The client initiates the connection with the server. The server then uses REST APIs to perform either of the above functions. Implementation MQTT An MQTT client can be any device that runs the MQTT library and connects to the MQTT broker and can have a very small footprint depending on the library used. An MQTT client usually sends data to the server, such as telemetry data. It contains scripts to publish messages to a topic. There are several MQTT client libraries available depending on your preferred programming language. An MQTT broker is the heart of this protocol and can handle millions of MQTT clients depending on the implementation. An MQTT broker needs to be highly scalable, integrated into your backend systems, and failure-resistant. The broker needs to receive, filter and forward all messages to the clients that subscribe to them. As mentioned earlier, it needs to maintain the data-sessions of all the clients connected to it. There are several implementations of the MQTT broker available as open-source or paid. LwM2M Depending on the function that you are using it for, there can be several implementations of the LwM2M client and server. The LwM2M client initiates a connection with the server. LwM2M uses a simple resource model with the core set of objects and resources defined in the specification. As an example, the device here is an object, with id 3 and the device has resources like firmware version, serial number, etc. which have a fix resource id. So to get information about a particular resource of the object device, the server can send a call like READ 3/3/0. The LwM2M client implementation contains code to initiate the connection with the server with credentials, sending the necessary data requested by the server, callback functions for LwM2M resource executions and send error events. It can also contain other functions depending on the use-case. The LwM2M server on the other hand needs to authenticate LwM2M clients, send correct requests using the REST API and process the requested information. There are several open-source as well as paid implementations available for the LwM2M client as well as server. LwM2M also has a Developer Toolkit which can be used to implement your own versions. Security MQTT MQTT supports various authentications and data security mechanisms. These mechanisms are configured on the broker and the client needs to comply with these mechanisms. MQTT uses TCP/IP and you can also leverage Transport Layer Security (TLS) to use secure the connection. LwM2M LwM2M also supports authentication and data transport security mechanisms. LwM2M uses CoAP which usually uses UDP as the transport protocol. When using UDP, LwM2M supports DTLS. CoAP also supports TCP and TLS accordingly. Use Cases MQTT MQTT is used for sending payload for low-power and constrained applications, thus making it a favorite choice for many IoT applications. MQTT brokers are a big component of Cloud based IoT solutions. Logistics - for connectivity and real-time monitoring of vehicles Manufacturing - For monitoring of manufacturing plants Smart Home - For energy monitoring, home security, home patient monitoring Oil and Gas - The use-case it was first built for, to monitor the oil pipelines Consumer products - Like smart appliances Urban Mobility - For city transportation systems, car sharing etc. LwM2M While LwM2M also supports sending telemetry data, it was built to standardize device management and provisioning, thus making it ideal for the 6 functions that it defines in its implementation. Bootstrapping - Enables headless device management, thus enabling shipping the devices without configuring them in the factory. Device Configuration - Enables device life cycle functionalities like enable, disable and update. Firmware Update - Enables FOTA/ SOTA for devices. Fault Management - Enables monitoring of statuses like battery level, memory, sw/hw version etc. Configuration & Control - Enables setting of APN and other functionalities for cellular connectivity, as well as activating, rebooting and disabling the device. Reporting - Enables error reporting from the devices Conclusion While deciding the right protocol for sending essential data from your connected devices to your application, the question is not whether you use MQTT or LwM2M. From the above description, you can see that both protocols were designed for different and specific purposes. So if your application needs a higher payload of data to be sent, you might choose MQTT and will have to implement functionalities like device provisioning, OTA on top of it. On the other hand, if the application needs to monitor critical statuses on the device, as well as needs the convenience of lightweight device management, you might want to choose LwM2M. Platforms like AWS IoT, Azure IoT Hub have an inbuilt version of the MQTT broker which you can use to send payload through your device. You then only have to configure the MQTT client on the device. The device management in AWS IoT and Azure IoT hub is then done through device shadow and device twins respectively. If you are hosting and managing your own cloud applications, you can use LwM2M for device management and build your own MQTT broker for messaging. There can also be use-cases where you might need to use a combination of both. In any case, it is important to understand that MQTT and LwM2M protocols are not replacements of one another but built for distinct use-cases. Stay glued to this space to see a comparison between MQTT and CoAP next. And if you wish to know more about protocols and IoT check out our Comprehensive Guide to IoT Protocols. Until then, Stay Connected!