Developing a successful MVP (Minimum Viable Product) is essential to attract early-adopters and validate your product idea. As hardware is at the heart of your IoT products, delays in getting the hardware to you can push your schedule by a lot. To minimize delay, EMnify has launched eSIM for evaluation, eliminating the shipping time associated with traditional SIMs. With the eSIM, you can just download your profile and immediately start using the connectivity platform to build your dashboard.
In this post, I'm going to show you just how easy it is to make your first API call with the EMnify eSIM. If you prefer video How-to's, then go check out this YouTube video about activating your eSIM and come back directly to Step 4.
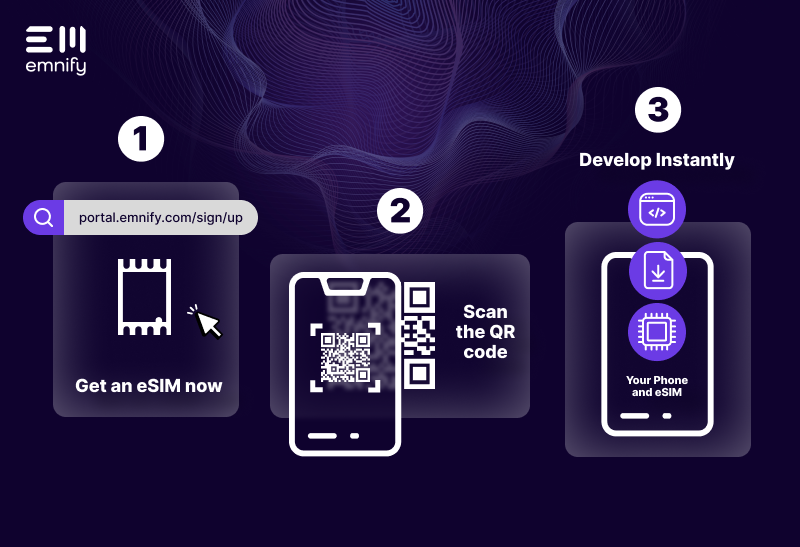
Step 1: Get a free account
If you don't have an EMnify account yet, go to portal.emnify.com and sign up for a free account.
Step 2: Get an eSIM
Once you are logged into your account on the EMnify portal, click on Get your FREE SIMs on the dashboard.

Select the eSIM option and click on LETS GET STARTED

The window will prompt you to Create a device. This is because you need to assign the SIM you are about to download to a device. You can also add tags to these devices to sort them better at a later stage.

Step 3: Download the eSIM profile
Once you're done creating a device, you can download the SIM by scanning a QR code. Select your preferred OS and the QR code will appear.
For iOS
On your eSIM compatible iPhone, Go to "Settings" > "Mobile Data" > "Add Data Plan".
Scan the QR code on your portal with your camera. This will initiate the eSIM profile download.
For Android
Go to "Settings" > "Network & internet" > "Mobile network" > "Advanced or +" > "Add mobile network or Don't have a SIM card" > Scan QR code to proceed >
Click "Download or Activate" to install the eSIM profile.
Use this SIM only for data. Use your primary SIM for all other purposes, and do not forget to Enable Roaming.
** Note This SIM can only be used in a eSIM compatible device.
You can get the list of eSIM compatible devices here. You can also check if eSIM provides coverage in your region here.
The last step before testing your eSIM is to set the APN. Set the APN to 'em' or 'emnify' for the EMnify SIM.
For iOS
Go to Settings > Mobile Data > Select the EMnify SIM > Mobile Data Network > Mobile Data APN
For Android
Go to Settings > Wi-Fi & Internet > SIM & Network > Select the EMnify SIM > Access Point Names > Click on the '+' sign to add the APN.
Step 4: Authenticate API
Now that you have downloaded and activated the eSIM, let's quickly make an API call to check its status.
Now every API call needs authentication. We use JWT (JSON Web Token) for authenticating our APIs. There are 2 ways to get this authentication token.
- Using Username and Password
This is the same username and password you used to create the EMnify account - Using Application Token
You can get an application token in the EMnify portal > Integrations > Application Tokens
You can use the Authenticate API to get the Authentication Token
Step 5: Get Device Status
Once you have the token, you can use the Endpoint API to list all your devices and get their statuses. Let's take a look at the call.
fetch(`https://cdn.emnify.net/api/v1/endpoint`, {
        method: 'GET',
        headers: {
            "accept": "application/json",
            "Authorization": `Bearer ${token}`
        }
      })
      .then(result => result.json())
      .then(result => {
        console.log(result)
      })
Here the token is the authentication token you received in Step 4. This call will get you the list of all your SIMs and their statuses. Let's take a detailed look at the response you get.
[
    {
        id: 11180765,
        name: 'Test_device231',
        tags: 'dashboard',
        created: '2021-06-24T19:02:43.000+0000',
        last_updated: '2021-06-24T19:02:49.000+0000',
        status: { id: 0, description: 'Enabled' },
        service_profile: { id: 421239, name: 'Generic Service Profile' },
        tarif_profile: { id: 409292, name: 'Generic Rate Plan Profile' },
        sim: {
        id: 3991447,
        iccid: '898830300000***9680',
        imsi: '2950509****1169',
        msisdn: '423**39212***74'
        },
        imei: **********,
        ip_address: '100.**.*.***',
        ip_address_space: { id: 6808 },
        imei_lock: false
    }
]
You can use this data to check if your device is enabled as well as use the Id and the tags to sort them on your dashboard.
And that's it! Five easy steps to start building your IoT Dashboard. You can integrate other APIs to create a coherent dashboard, a one stop-shop to get an overview of your devices. You can also go ahead and integrate the Multi Cloud Data Streamer (MCDS) to automate a bunch of your processes with the devices like activation, diagnostics, billing etc. The possibilities are endless. You can check out the MCDS integration guides. Let me know what functionalities your MVP includes and share what cool things you've built!
Stay Connected!

Shruti Kuber
Shruti Kuber is a Developer Advocate and Community Manager at emnify.