Cloud IoT Core is a service provided by Google Cloud Platform that allows the management of IoT devices and data at scale. This guide will focus on creating an IoT Core Registry and onboarding a Raspberry Pi as an example device.
Prerequisites
The prerequisites for receiving device data in Cloud IoT Core are:
- A device with a cellular modem. This example uses a Rasberry Pi.
- The Raspberry Pi should have
gitandnode.jsinstalled. - The Raspberry Pi needs to have python 2.7.9 or higher installed. The default Python version used by the Google Cloud Platform SDK is version 2 which has reached EOL as of January 1, 2020. It is therefore highly recommended to use Python3.
- The Raspberry Pi should have
- A Google Cloud Platform (GCP) account with billing enabled. For information on how to enable billing for the project, see the GCP billing documentation.
Note: If you do not have a Raspberry Pi, the SDK can also be installed and run from mac or windows, and running the example described in the Device Configuration section will essentially create a "virtual device" that can be configured on your desktop machine for convenience.
Benefits
- Securely authenticated and encrypted communication between device and cloud
- Open source development tools for sending device sensor data or telematics to Google Cloud Platform
- Management platform for connecting, monitoring, and controlling device fleets
- Granular control of device permissions by grouping by device type or tag
- Remotely orchestrate device logic from the Google Cloud Platform such as firmware upgrades
Note: Customers not using GCP IoT Core should look into securing device data using EMnify Cloud Connect.
Creating an IoT Core Device Registry
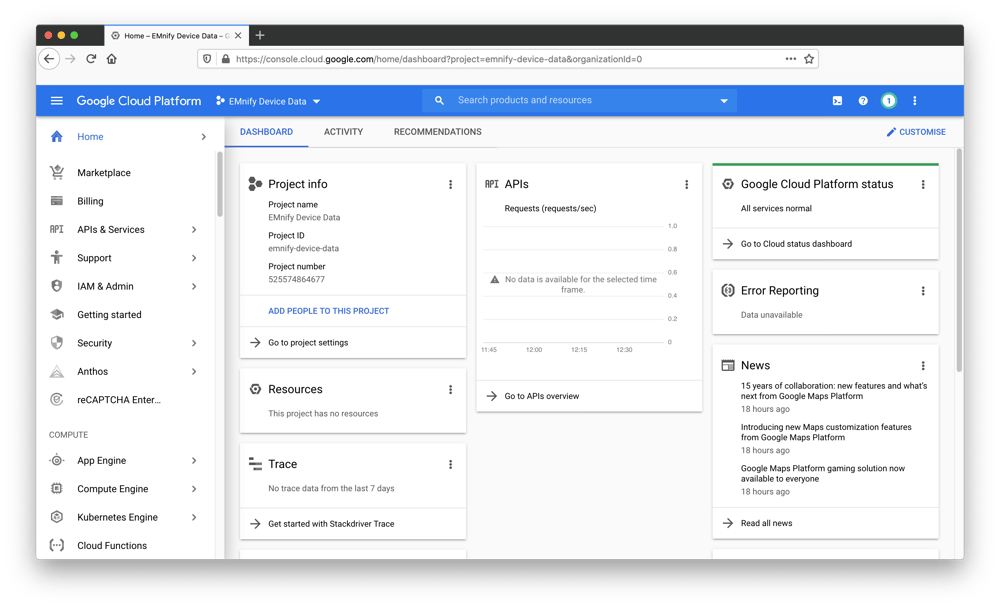
In the Cloud Console create a Cloud project named EMnify Device Data. If you don't plan to keep the resources that you create after you finish these steps, you can delete the project, removing all associated resources.
Enable the Cloud IoT Core and Cloud Pub/Sub APIs by visiting the following configuration page. Select the EMnify Device Data project and click Continue: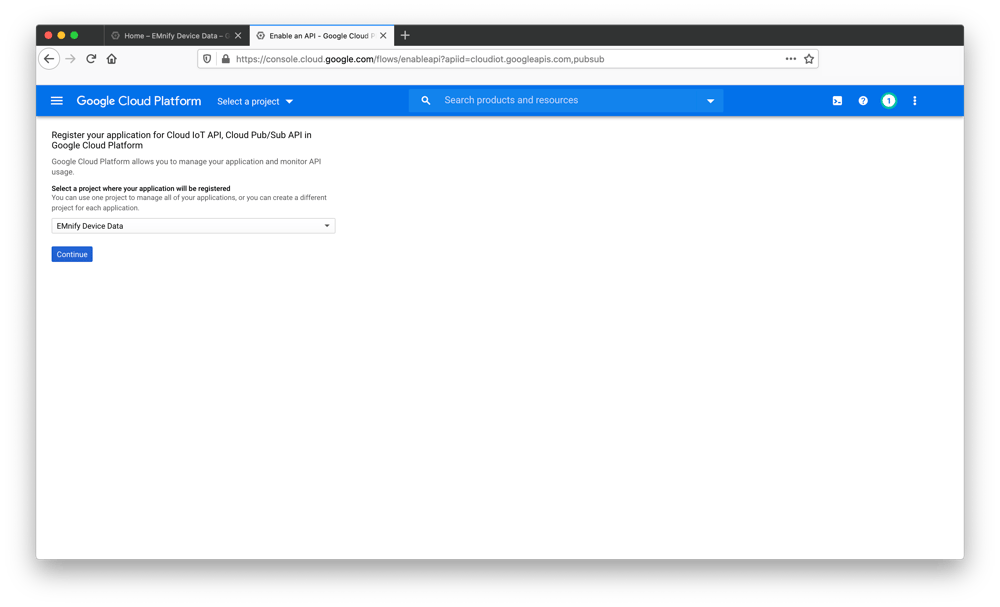 Skip the section for adding API credentials and navigate to Google Cloud IoT Core page
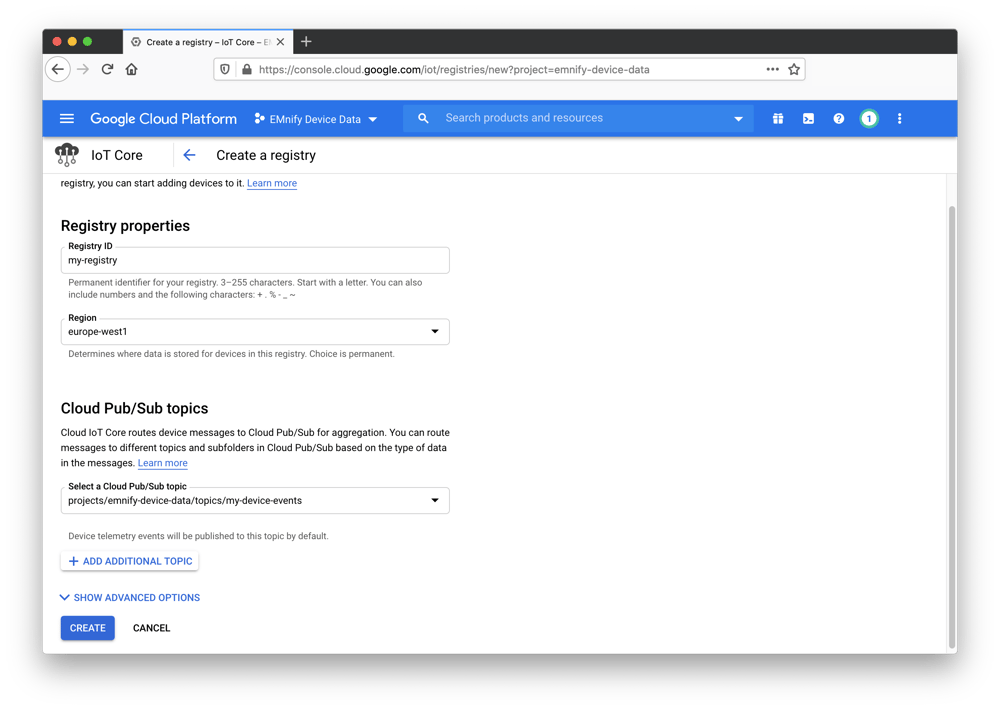
- Click Create registry and enter
my-registryfor the Registry ID. - Select your preferred region, we will use europe-west1 for this example.
- In the Cloud Pub/Sub topics dropdown list, select Create a topic, and name it
my-device-events - Click Create in the Create a topic dialog.
- The Device state topic and Certificate value fields are optional, so leave them blank
- Click Create on the Cloud IoT Core page.
 In a terminal window (preferably the Raspberry Pi as we will copy the private key for use later), run the following command to generate an RS256 Key:
openssl req -x509 -newkey rsa:2048 -keyout rsa_private.pem -nodes -out rsa_cert.pem -subj "/CN=unused"A public and private key will be generated in the current directory. We will later add the public key (rsa_cert.pem) to IoT Core so that we can authenticate incoming messages by checking if they have been signed by the private key which should be securely stored on the device: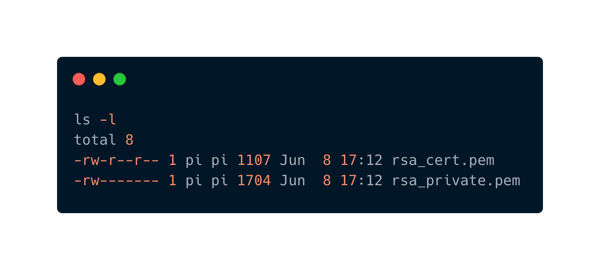
-
On the Registries page, select
my-registry. -
Select the Devices tab and click Create a device and enter
my-devicefor the Device ID. -
Select Allow for Device communication.
-
Add the public key information to the Authentication fields.
- Copy the contents of
rsa_cert.pemto the clipboard including the lines that say-----BEGIN CERTIFICATE-----and-----END CERTIFICATE-----. - Select RS256_X509 for the Public key format.
- Paste the public key in the Public key value box.
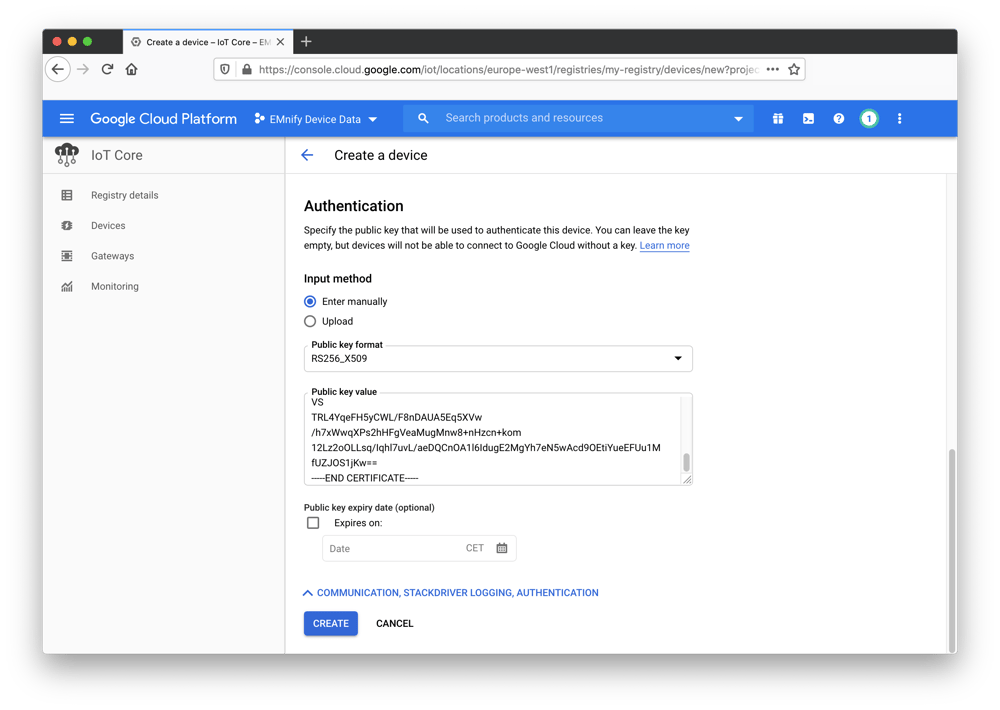
- Copy the contents of
-
The Device metadata field is optional; leave it blank.
-
Click Create.
The device has been added to the registry with an associated public key and is ready to receive incoming data: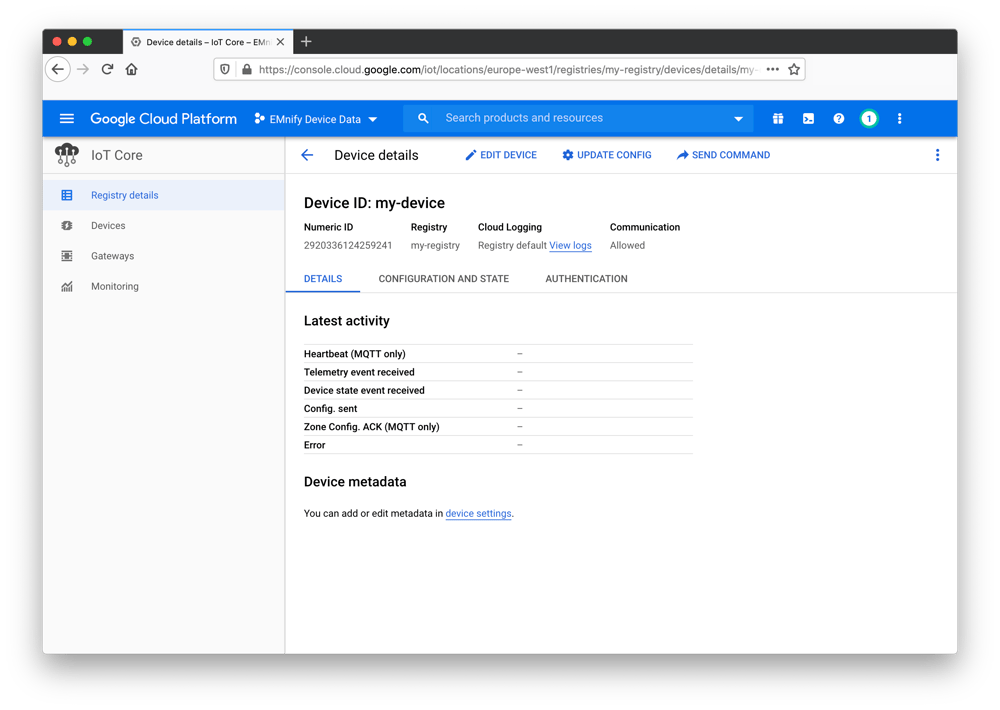
Device Configuration
Follow the steps of the Debian Install for the Google Cloud Platform SDK be installed on a Raspberry Pi. When finished, initialize the SDK using gcloud init.
A setup wizard will guide you through the process of authentication with your GCP account. When this is finished, commands that require authentication will use your GCP account and will reference the project `emnify-device-data` by default. Clone and install the example project provided by Google:
git clone https://github.com/GoogleCloudPlatform/nodejs-docs-samples
cd nodejs-docs-samples/iot/mqtt_example
cp ../../../rsa_private.pem .
npm install
Publishing to IoT Core
Use the SDK with the EMnify IoT Project name to create a subscription topic for the device:
https://carbon.now.sh/?bg=rgba(31%252C129%252C109%252C0)&t=night-owl&wt=none&l=application%252Fx-sh&ds=false&dsyoff=20px&dsblur=68px&wc=true&wa=true&pv=11px&ph=33px&ln=false&fl=1&fm=Hack&fs=14px&lh=143%2525&si=false&es=2x&wm=false&code=gcloud%252520pubsub%252520subscriptions%252520create%252520%25255C%25250Aprojects%25252Femnify-cloud-iot-core%25252Fsubscriptions%25252Fmy-subscription%252520%25255C%25250A--topic%25253Dprojects%25252Femnify-cloud-iot-core%25252Ftopics%25252Fmy-device-events
https://carbon.now.sh/?bg=rgba(31%252C129%252C109%252C0)&t=night-owl&wt=none&l=application%252Fx-sh&ds=false&dsyoff=20px&dsblur=68px&wc=true&wa=true&pv=11px&ph=33px&ln=false&fl=1&fm=Hack&fs=14px&lh=143%2525&si=false&es=2x&wm=false&code=gcloud%252520pubsub%252520subscriptions%252520create%252520%25255C%25250Aprojects%25252Femnify-cloud-iot-core%25252Fsubscriptions%25252Fmy-subscription%252520%25255C%25250A--topic%25253Dprojects%25252Femnify-cloud-iot-core%25252Ftopics%25252Fmy-device-events
gcloud pubsub subscriptions create \
projects/emnify-device-data/subscriptions/my-subscription \
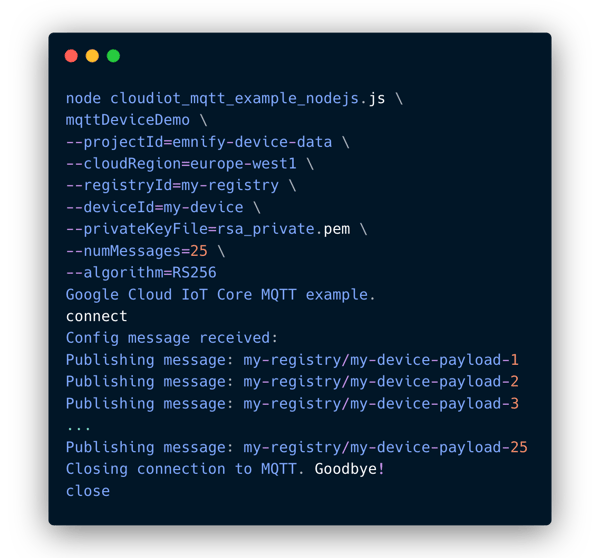
--topic=projects/emnify-device-data/topics/my-device-eventsThen start the node.js project and pass in project configuration with the following command
node cloudiot_mqtt_example_nodejs.js \
mqttDeviceDemo \
--projectId=emnify-device-data \
--cloudRegion=europe-west1 \
--registryId=my-registry \
--deviceId=my-device \
--privateKeyFile=rsa_private.pem \
--numMessages=25 \
--algorithm=RS256
If everything is configured correctly, the output should look like the following:
Telemetry events should be visible in the IoT Core Monitoring section: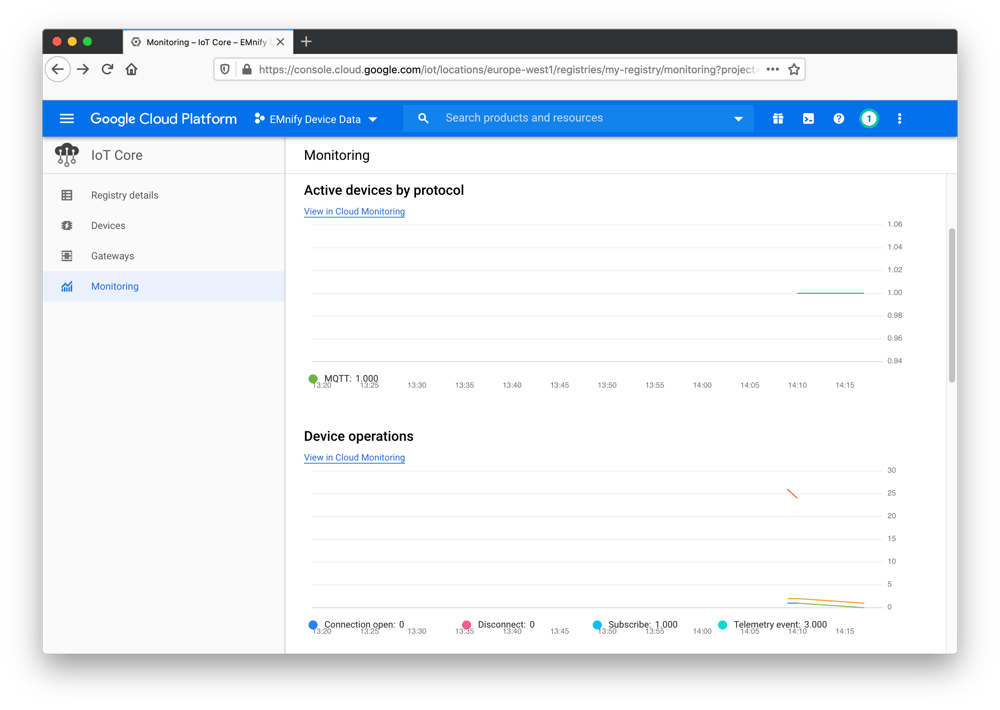
The published telemtetry data can be viewed in the my-device-events Pub/Sub Service topic:

Scaling up
This guide shows how to onboard a single device by creating certificates and storing them manually on the IoT device: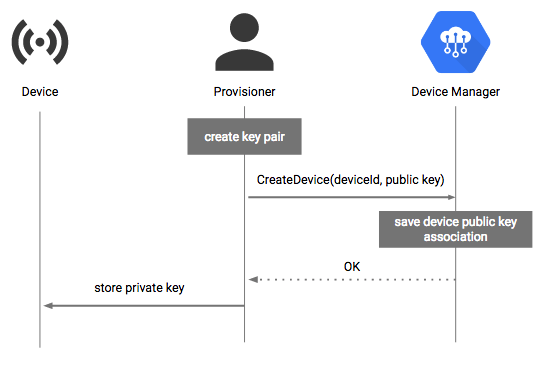 This can be cumbersome at scale when provisioning certificates to thousands of devices. Google Cloud Platform does not have an official service for this kind of bulk provisioning but there is a common pattern for this use case where a Certificate Vending Machine model is employed. This model is for customers who have not generated keys during the manufacturing process and therefore no certificates are pre-installed on the devices.
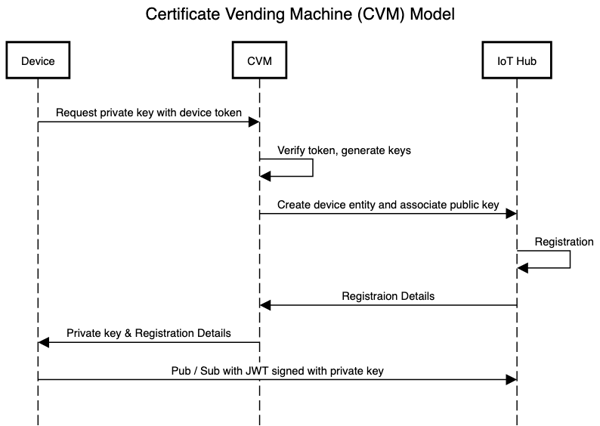
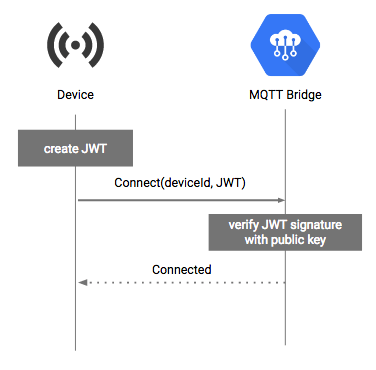
This model requires that you know a unique identifier and that these identifiers are on the device before they are deployed. When the IoT device has an initial active internet connection, an onboarding process is triggered where the device contacts a certificate manager server (the CVM) which checks the validity of the incoming token and generates X509 keys and registers a device in IoT Core on-demand. In this case, the CVM application server would use the Google Cloud Platform SDK to update or create resources programmatically instead of manually-run commands shown above. The private key can then be sent back to the device for secure storage and is then used for authenticating communication between the device and IoT Core.
Next Steps
This guide shows how to send telemetry data from one device to the Google Cloud Platform IoT Hub. The Google Cloud documentation has a range of articles and demo projects for ingesting and processing data using IoT Core. A good example guide is performing realtime processing on incoming telemetry using Cloud Storage, Compute Engine, and Datastore.

emnify
The content team of emnify is specialized in all things IoT. Feel free to reach out to us if you have any question.