You can use Postman as a powerful tool for testing and running EMnify’s Rest-API and perform operations in bulk.
Contents:
- Create an Application Token
- Getting Started with Postman
- Retrieve Authentication Token
- Register SIMs via API
- Create Multiple Endpoints via API
- Update SIMs via API
- Activate 1 SIM
- Activate multiple SIMs
Create an Application Token
The Application Token or “API-Key” is necessary for Authentication
- Visit the Integrations page in the EMnify Portal
- Scroll down and click “Add Token”
- Set a description and optionally an expiry date for your token
- Click "Create Application Token"
- Save the application token in a secure place
Getting Started with Postman
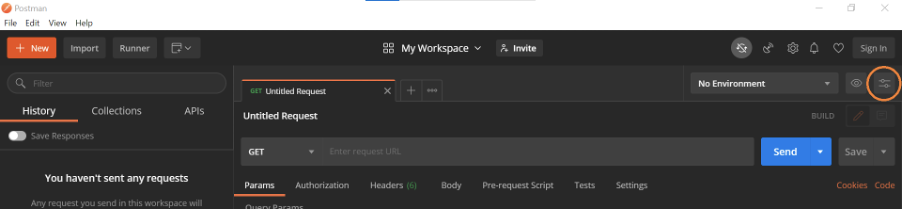
- To create a new Environment in Postman click on the settings icon
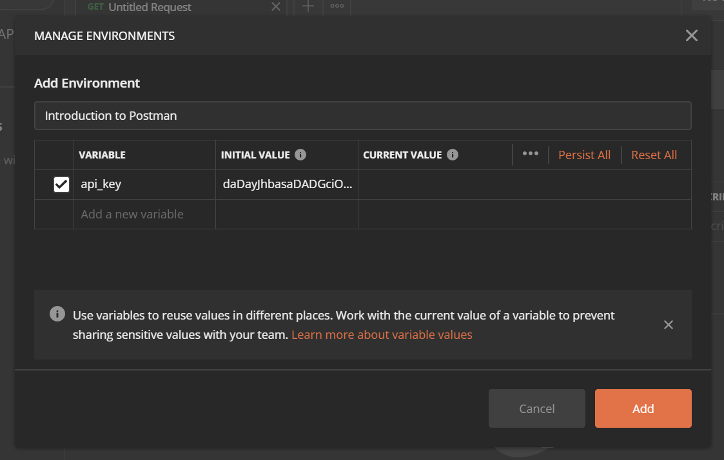
- Add a Variable named “api_key” and paste the application token into the field under Initial Value. This enables you to save and use the application token within Postman.
- To save your API calls in Postman, click on Collections on the left side and then +New Collection. Name the Collection “Authentication” for the next step.
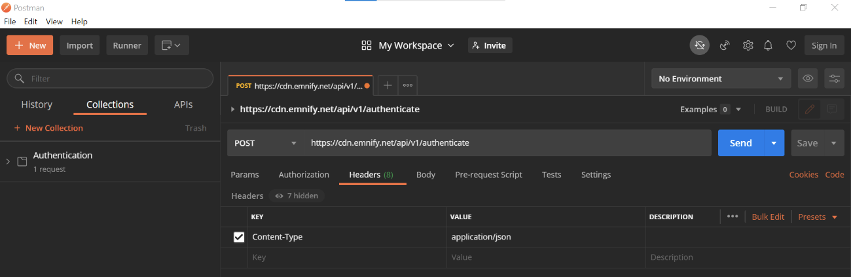
Retrieve Authentication Token
- Paste https://cdn.emnify.net/api/v1/authenticate into the URL field in Postman and set the call type to POST
(see all API Calls in our API Documentation) - In the Headers tab, create a Key called “Content-Type” and add “application/json” as the Value. All API calls to the EMnify API must have this content type.
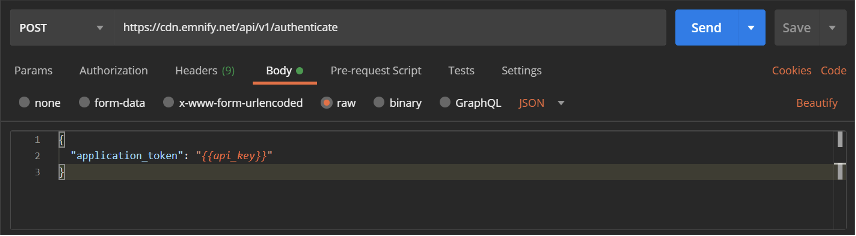
- In the Body tab, select raw and insert the code below:
{
"application_token": ""
}
- Since the authentication token is only valid for 240 minutes upon creation, it can be captured and used in further API calls when an authentication token is required. To capture the authentication token, create a new variable Auth_Token with an empty initial value. Click on the Tests tab and insert the following:
var jsonData = JSON.parse(responseBody);
postman.setEnvironmentVariable("Auth_Token",jsonData.auth_token)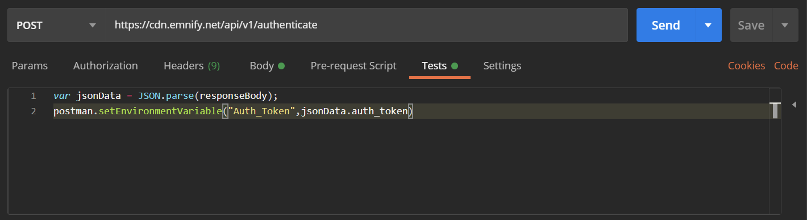
- Save your API Call to your previously created collection in Postman.
- click Send. A “200 OK” response status indicates a successful retrieval of the authentication token.
Register SIMs via API
To update (activate, suspend or delete) your SIMs you must first register them via the EMnify Portal using the BIC-Code.
Alternatively, you can register one or multiple SIMs using the following API Call (Example BIC “ABCD1234EFGH6789”):
- Click the +New Button in the top left corner of Postman to create a new request.
Name the request “SIM Registration” and add it to a new collection called “SIMs”. - API Call: GET https://cdn.emnify.net/api/v1/sim_batch/bic/ABCD1234EFGH6789
- Insert “Content-Type” and “Authorization” as Keys in the Header tab and add the Values “application/json” and “Bearer ” as shown below.

- Click Send. A “200 OK” Response Status indicates successful Registration of the SIMs.

Kevin Waldmann