The first part of this post explains how to set up a Raspberry Pi with a Sixfab “Cellular IoT HAT” extension board and prepare it for custom evaluation of an LTE-M or NB-IoT network. For this purpose, we introduced a Python program template that allows users to submit a sequence of AT control commands to the sixfab LTE-M/NB-IoT modem which is based on a Quectel BG96 network interface module.
In this post, I will describe my own experience with cellular IoT trials in a difficult-to-reach area which represents a typical IoT location for device deployment: a room located below ground level with concrete walls where no standard cellular network can be used.
Here, my LTE mobile phone does not work at all, but it is a perfect IoT test location because for electricity smart meters or other monitoring devices in urban areas or for industrial use cases these environmental conditions are quite typical. The good news is that cellular IoT connectivity solutions like LTE-M and especially NB-IoT have been designed for these use cases, and they are able to outperform other LPWAN technologies in this particular field.
Scanning local LTE-M and NB-IoT networks
Connecting a cellular IoT device for the first time in environments with weak signaling conditions is tricky and might take a significant amount of time, especially for NB-IoT. The modem will search for cells one by one in all frequency bands allowed for selected technology (RAT), i.e. in more than ten bands for LTE. For NB-IoT, during the network scan, the modem assumes a good signal condition at first and tries to negotiate connection parameters with no coverage enhancement level (CE level = 0). If this attempt fails, the NB-IoT modem will retry connecting with increased CE levels 1 and 2 where an additional number of repetitions are applied to each transmitted data packet. Scanning all LTE-M bands will take just about ten seconds, but it will take several minutes (!) to try all possible NB-IoT bands of a single network.
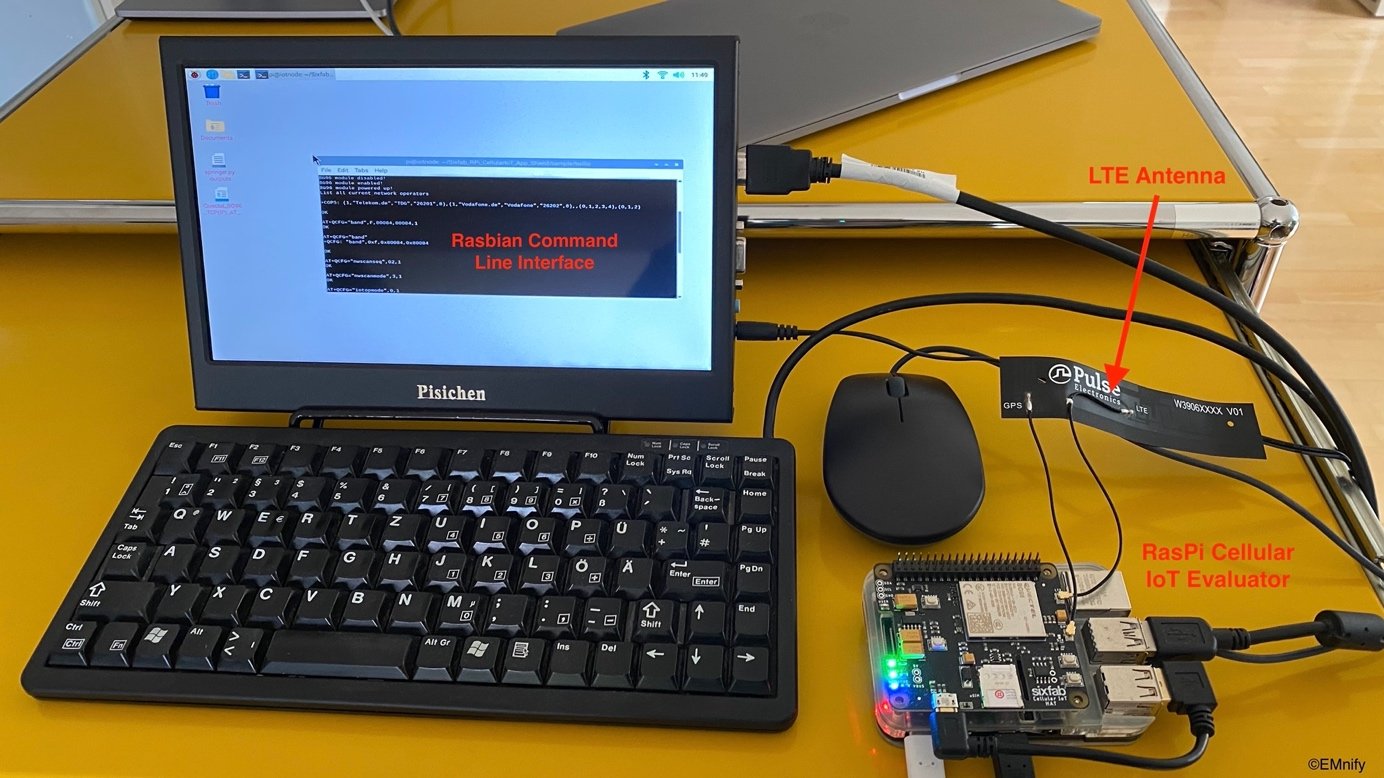
So, let’s get started to perform some hands-on evaluation with our RasPi IoT test modem. Once you have powered up the system, you can use a customizable Python program template as explained in the previous post. As a start, you will have to load Sixfab library cellulariot.py and activate the BG96module:
#name: sample.py
from time import sleep
from cellulariot import cellulariot
node = cellulariot.CellularIoT()
#reset and enable BG96 module
node.setupGPIO()
node.disable() #GPIO pin BG96_ENABLE
sleep(1) #wait 1 sec
node.enable() #GPIO pin BG96_ENABLE
sleep(1) #wait 1 sec
node.powerUp() #GPIO pin BG96_PWRKEY
By default, the modem starts searching for a network right away after power on. First, it will acquire network information from the modem non-volatile (NV) memory which is updated each time the module shuts down, e.g. with the latest registration data. This approach will speed up the registration process during device lifetime in the field. But in case of failure, or if the device has been just deployed and powers up for the first time, a complete network scan will be required. In automatic mode, PLMN information stored in the SIM card will be considered first, but Quectel BG96 offers several options on how to limit the scan of available networks and how to force network selection individually.
Refer to BG96 Network Searching Scheme Introduction for further information on which procedures and options have been implemented by Quectel. All AT commands are submitted by function sendATComm() provided by mentioned Sixfab library cellulariot.py.
For my LTE-M trails, I used the following QCFG command sequence including specific parameters to limit the network scan to decrease the search duration:
# Limit search to LTE bands B3,B8 and B20 (sufficient for most of Europe)
node.sendATComm("AT+QCFG=\"band\",F,80084,80084,1","OK\r\n")
# Search LTE Cat M only. i.e. no Cat NB or GSM
node.sendATComm("AT+QCFG=\"nwscanseq\",02,1","OK\r\n")
node.sendATComm("AT+QCFG=\"nwscanmode\",3,1","OK\r\n")
# Scan sequence: Cat M only
node.sendATComm("AT+QCFG=\"iotopmode\",0,1","OK\r\n")
# Query available networks
node.sendATComm("AT+COPS=?","OK\r\n")
At my test location, it turns out that two LTE-M cells by different network providers are in reach and the final AT command COPS=? returns
+COPS:(1,"Vodafone.de","Vodafone","26202",8),(2,"Telekom.de","
TDG","26201",8),,(0,1,2,3,4),(0,1,2)
For NB-IoT the following command parameters have been used:
# Limit search to LTE bands B3,B8 and B20 node.sendATComm("AT+QCFG=\"band\",F,80084,80084,1","OK\r\n")
# Search LTE Cat NB only. i.e. no Cat M or GSM
node.sendATComm("AT+QCFG=\"nwscanseq\",03,1","OK\r\n")
node.sendATComm("AT+QCFG=\"nwscanmode\",3,1","OK\r\n")
node.sendATComm("AT+QCFG=\"iotopmode\",1,1","OK\r\n")
node.sendATComm("AT+COPS=?","OK\r\n")
It turns out that three (3) NB-IoT cells by different network providers are in reach and final AT command COPS=? returns
+COPS: (1,"Telekom.de","TDG","26201",9),(1,"E-Plus","E-
Plus","26203",9),(1,"Vodafone.de","Vodafone","26202",9)
,,(0,1,2,3,4),(0,1,2)
Note: In general, instead of this Python approach you can also use a Rasbian terminal program like Minicom to submit AT commands to the modem.
Selecting a local LTE-M or NB-IoT network
During automatic network search, the modem will retrieve system information (SI) messages which are broadcasted by the LTE network base station (eNodeB). If requirements are met by a cell, the modem will measure received signal strength and quality. While searching or in case of doubt, the user device can occasionally check current network registration status via command CREG? which will return +CREG: 0,2 if auto scan is still ongoing.
By default, the most suitable cell will be selected by the modem automatically - based on criteria specified by module firmware and PLMN information stored in inserted SIM card provided by network service provider EMnify. If needed, the user device can also manually select a network in order to evaluate application-specific IoT requirements. For this purpose, the command AT+COPS=<mode>,<format>,<oper> can be used to force an attempt to select and to register on a specified network. As an example, from the list of available networks we select Vodafone Cat NB and submit the following command sequence to retrieve some relevant network parameters:
# Select Vodafone NB-IoT
node.sendATComm("AT+COPS=1,2,26202,9","OK\r\n")
# Query Network Information
node.sendATComm("AT+QNWINFO","OK\r\n")
# Query and Report Signal Strength
node.sendATComm("AT+QCSQ","OK\r\n")
# Signal Quality Report
node.sendATComm("AT+CSQ","OK\r\n")
# Get LTE Cat NB Coverage Enhancement Level
node.sendATComm("AT+QCFG=\"celevel\"","OK\r\n")
The Modem response is
+QNWINFO: "CAT-NB1","26202","LTE BAND 20",6347
+QCSQ: "CAT-NB1",-90,-109,55,-19
+CSQ: 12,99
+QCFG: "celevel",1
Command QCSQ returns measured reference signal received power (RSRP) value of -109 dBm and reference signal received quality (RSRQ) value of -19 dB This means that signaling conditions at my test location are quite poor – according to the following figure which is providing a rough indication of how to rate RSRP and RSRQ values.
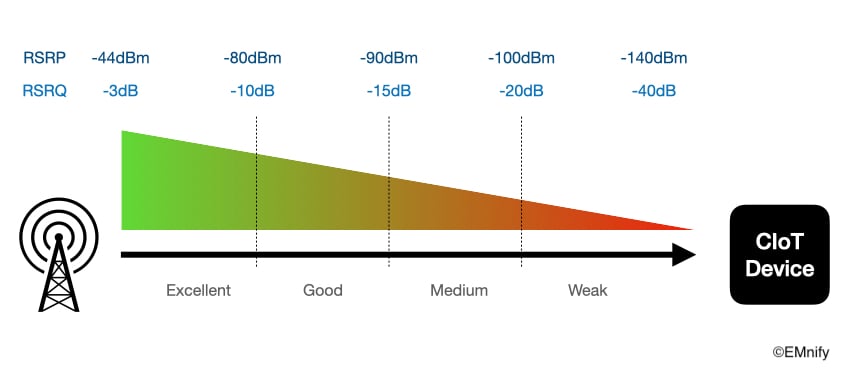
Both LTE-M and esp. NB-IoT cellular networks have been designed for this kind of poor environment, but may require coverage enhancement (CE) leading to repeated transmissions of payload data packets. In this case, where we look at a Cat NB network, command AT+QCFG="celevel" indicates that a moderate CE level = 1 i.e. a few repetitions which would certainly increase transmission time, but the overall impact depends on how frequently IoT data will be uploaded. But nevertheless, any CE level > 0 should be considered carefully especially for battery-powered IoT devices. LTE-M works with a similar coverage extension technique, but unfortunately, the Quectel BG96 command set does not support mentioned ”celevel” command parameter for LTE-M networks.
Configuring an LTE-M and NB-IoT network
Once you have identified your favorite local network you can attach to it and configure it according to your IoT requirements. For manual registration of, for example, Telekom LTE-M network via EMnify service you can use the following AT command sequence:
#Select Telekom LTE-M network
node.sendATComm("AT+COPS=1,2,26201,8","OK\r\n")
#Check Network Registration Status (1 or 5 = registered)
node.sendATComm("AT+CREG?","OK\r\n")
#Query Network Information
node.sendATComm("AT+QNWINFO","OK\r\n")
#Name of registered network
node.sendATComm("AT+QSPN","OK\r\n")
The Modem response is
+CREG: 0,5
+QNWINFO: "CAT-M1","26201","LTE BAND 20",6400
+QSPN: "Telekom.de","TDG","EMnify",0,"26201"
Now you can configure some network parameters according to your requirements, e.g. in order to optimize battery lifetime by keeping the IoT device in sleep mode most of the time and activate it during infrequent data transmission slots only. For this purpose, BG96 is offering commands like QPSMS and CEDRXS which are allowing users to adjust PSM and eDRX timing parameters and request setting of corresponding network timers accordingly.
Sending IoT data via SMS
For most IoT applications, IP-based communication will be preferred, but many use cases still rely on good old SMS messages for uplink transmission of IoT data. According to 3GPP standard, SMS is not a mandatory feature for LTE-M and NB-IoT deployments, but available for most LTE-M networks - but not for NB-IoT. In any case, SMS is good enough for the first cellular connection of our RasPi Cellular IoT tester.
Besides sendATComm() function that we used before, open-source library cellulariot.py is also providing Python code snippets for TCP/IP and UDP communication as well as a function called sendSMS(). In fact, the function sendSMS is replicating SMS assembly in text mode and submitting the message via AT commands CMGF and CMGS (using sendATComm function). Here, we are just using the sendSMS function “as is” after we have registered our RasPi modem on a Telekom LTE-M network. For my test location, this SMS test was also working with the Telefonica o2 LTE-M network.
#Check Network Registration Status (1 or 5 = registered)
node.sendATComm("AT+CREG?","OK\r\n")
#Send SMS message
node.sendSMS("4917612345678","Hello from RasPi CIoT tester")
Just replace the placeholder parameter with your own phone number (starting with country code) and check it out. Stay connected!

Kersten Heins
Kersten Heins is a freelance technical editor and blogger (www.iot-chips.com) for cellular LPWAN solutions and IoT security. On top of this, Kersten is the author of “NB-IoT Use Cases and Devices - Design Guide”, a new book for Springer Verlag to be published soon (see advance info here). After his graduation, Kersten spent 30 years in the embedded computing and semiconductor industry as a design engineer and in various marketing positions. See his LinkedIn profile. In his free time he tries to stay in shape (running, fitness) and likes to ride his Ford Mustang.