Connect devices securely to your Google Cloud Platform services
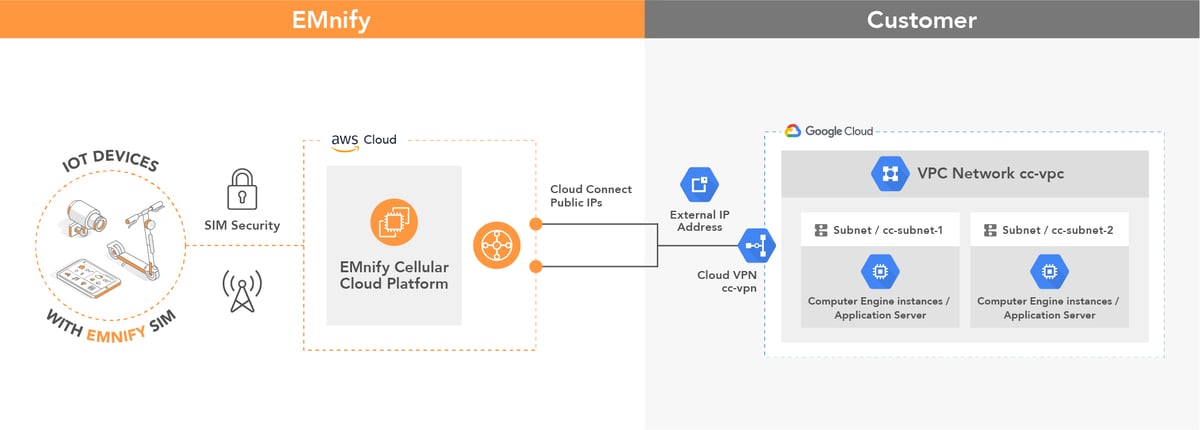
EMnify provides a secure integration of IoT devices with applications on Google Cloud Platform utilizing a fully-redundant VPN connection to the Google VPC, allowing customers to directly peer with their devices and remotely access them within their private network.
How the integration looks like
Prerequisites
The setup of a VPN requires
-
- a device with an active EMnify SIM
- Google Cloud Platform account with VPC and Instance
- the device sends data to an application in a VPC / Instance (e.g. Python, Node.js, Java application / MQTT broker)
- one public IP address used by the VPC
Benefits
- default redundant managed VPN for high-grade service availability
- remotely access devices from Google Cloud infrastructure via telnet / SSH or other protocols
- no need for private APNs to establish VPN, always static IPs to reach devices
- device data does not traverse the public internet
- devices and the application infrastructure reside within the same private network
- no carrier-grade NAT between device and cloud which allows e.g. to setup SIP services without additional STUN server (Session Traversal over UDP through NAT)
Remarks
- The secure connection is associated with a specific Instance - for example when hosting an own MQTT server. Steps for getting started using Google Cloud IoT can be found in our integration guide.
- Backend CIDRs shall be allocated only in the private IP address space. Public IP address ranges are not allowed because this would essentially allow a malicious customer to hijack all the traffic to any public site.
- A Google Cloud environment may or may not be in place by the time the CloudConnect breakout is created. For the purpose of this example, we will create all the necessary resources from scratch.
- In order to avoid that the Emnify⟷GCP VPN crosses large geographical distances and to improve the latency in communicating between application servers and devices, a good strategy is to minimize the distance between the CloudConnect breakout and the GCP resources. CloudConnect currently supports the AWS regions eu-west-1 (Ireland), us-east-1 (N. Virginia), and ap-southeast-1 (Singapore). For a comparison on regions and naming conventions, see the AWS regions and GCP regions documentation.
Configuration Steps
The following steps illustrate how to set up a VPN interconnection of your Google Cloud Platform with the EMnify infrastructure.
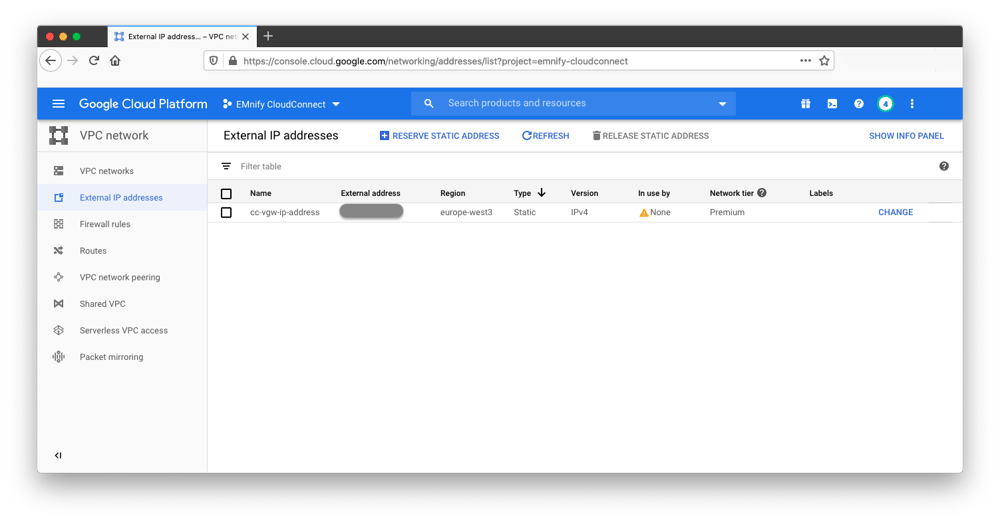
- In google cloud console, navigate to Project -> Networking -> External IP Addresses and create a new External IP address named cc-vgw-ip-address. The Network Tier must be set to Premium as the Standard tier Public IP addresses cannot be associated to VPN gateways.
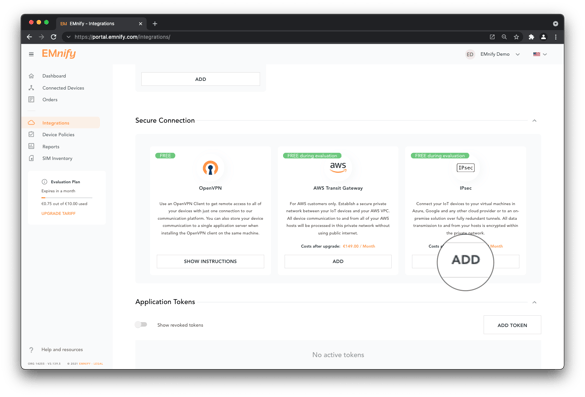
- In the EMnify platform, navigate to the integrations page. In the Secure Connection panel under IPsec, click + Add Secure Connection:
- With IPsec as the attachment type:
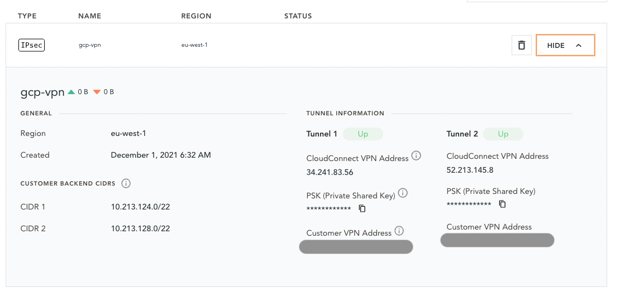
- Add a name, gcp-vpn in this case, provide the address from Google Cloud Console's External IP address (cc-vgw-ip-address). Up to three backend CIDRs (each for a subnet in the VPC where the application server resides) can be configured, we will use 10.213.124.0/22 and 10.213.128.0/22. In the case where an IP address space is already taken, an error message will be generated and new CIDRs must be chosen. The backend CIDRs unavailable to use for CloudConnect are provided in the following report.
- If Service Profiles exist with a different breakout region than the CloudConnect attachment, users are prompted to update existing profiles to use the VPN for their internet breakout.
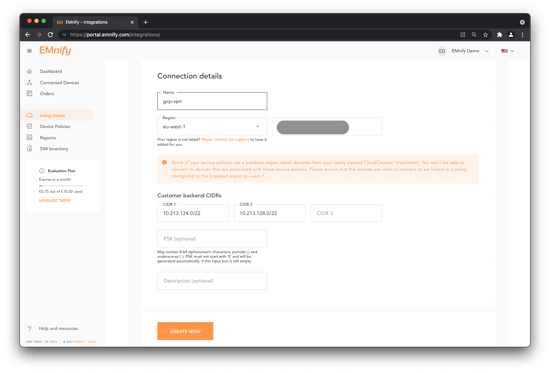 TIP: If no PSK is provided, one will be generated automatically by CloudConnect and can be copied from the UI when the attachment has been created.
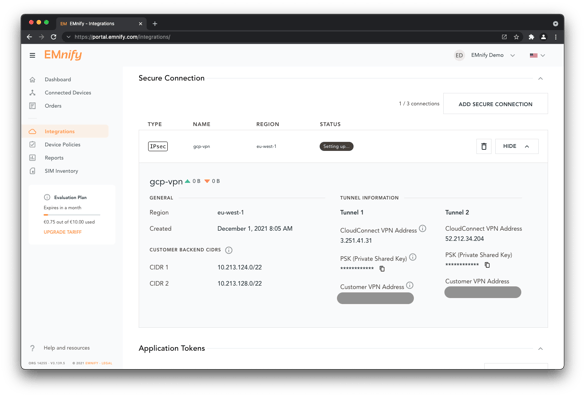
The state of the CloudConnect attachment will initially be shown as Setting up. When a state of Not Connected is shown, the configuration on the Google Cloud Platform can be completed:
 Google Cloud VPN and Tunnel creation
After the CloudConnect attachment is shown as Not Connected in the EMnify portal, navigate to the Google Cloud Console and from the VPC Networks menu,
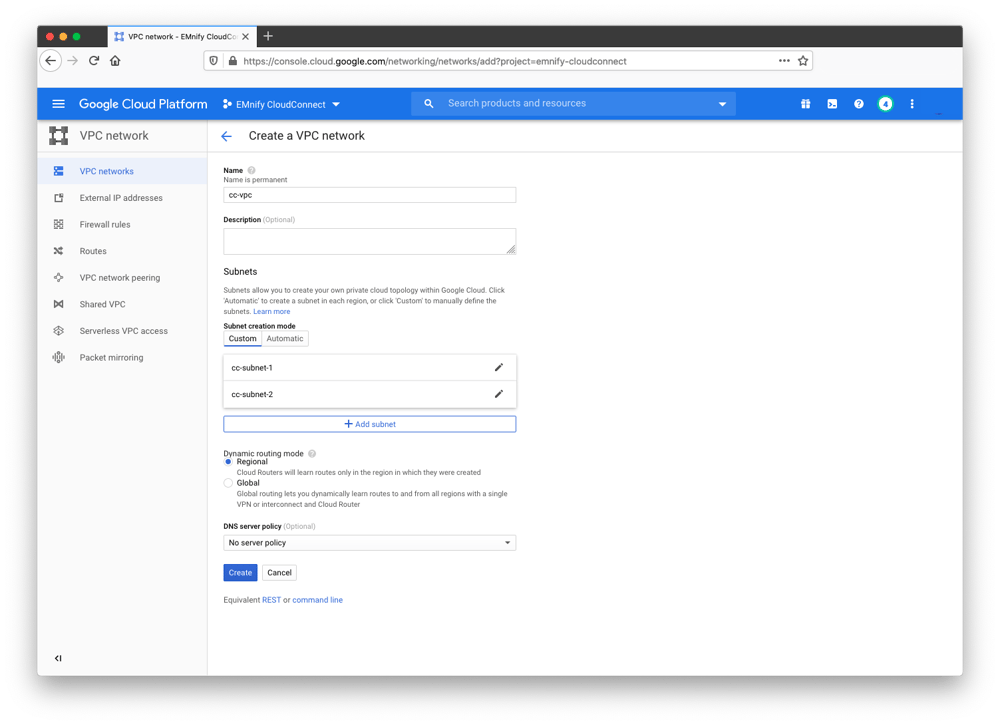
- select VPC Networks and click + Create VPC Network to create a network named cc-vpc
- Add a subnet named cc-subnet-1, in the europe-west3 (Frankfurt) region with the first Customer Backend CIDR (10.213.128.0/22) listed in the Cloudconnect UI
- Add a second subnet named cc-subnet-2, in the europe-west3 (Frankfurt) region with the second Customer Backend CIDR (10.213.64.0/22) listed in the Cloudconnect UI
- Leave Dynamic routing as Regional, omit a DNS server policy and click Create
CIDRs: Additional information on CIDR ranges can be found in the Google Cloud VPC Documentation.
- Navigate to Menu -> Hybrid Connectivity and click Create VPN Connection, select Classic VPN.
- Set the name to cc-vpn. The network and IP address dropdown boxes should allow to select from the resources already created. Select cc-vpc as the network, cc-vgw-ip-address as the IP address, and the region with our other resources (europe-west3).
- Tunnel 1 of the VPN Connection should have the following settings
- Add the CloudConnect VPN Address from tunnel 1 in the EMnify CloudConnect UI as the Remote peer IP address
- Set Routing Options to Route-based and add 100.64.0.0/10 as the Remote network IP range
- Copy the PSK from the EMnify UI for Tunnel 1 and paste it in the IKE pre-shared key section.
- Tunnel 2 of the VPN Connection should have similar settings to the previous step:
- Add the CloudConnect VPN Address from tunnel 2 in the EMnify CloudConnect UI as the Remote peer IP address
- Set Routing Options to Route-based and add 100.64.0.0/10 as the Remote network IP range
- Copy the PSK from the EMnify UI for Tunnel 2 and paste it in the IKE pre-shared key section.
- Click Create to finish creating the VPN connection.
Note: To get the real IP address ranges that your devices use - check the Portal under Integrations -> IP Address Space Management. If you want to use all potential IP ranges that EMnify uses, these are: 10.192.0.0/12, 100.64.0.0/10, 10.112.0.0/12, 10.176.0.0/12
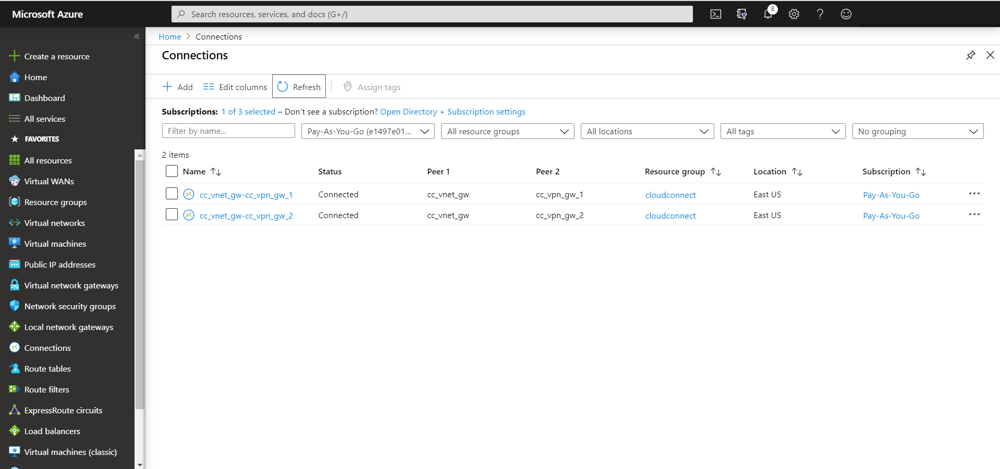
A new VPN connection should be displayed in the Cloud VPN Gateways section and will have no warning indicators if the creation was successful:
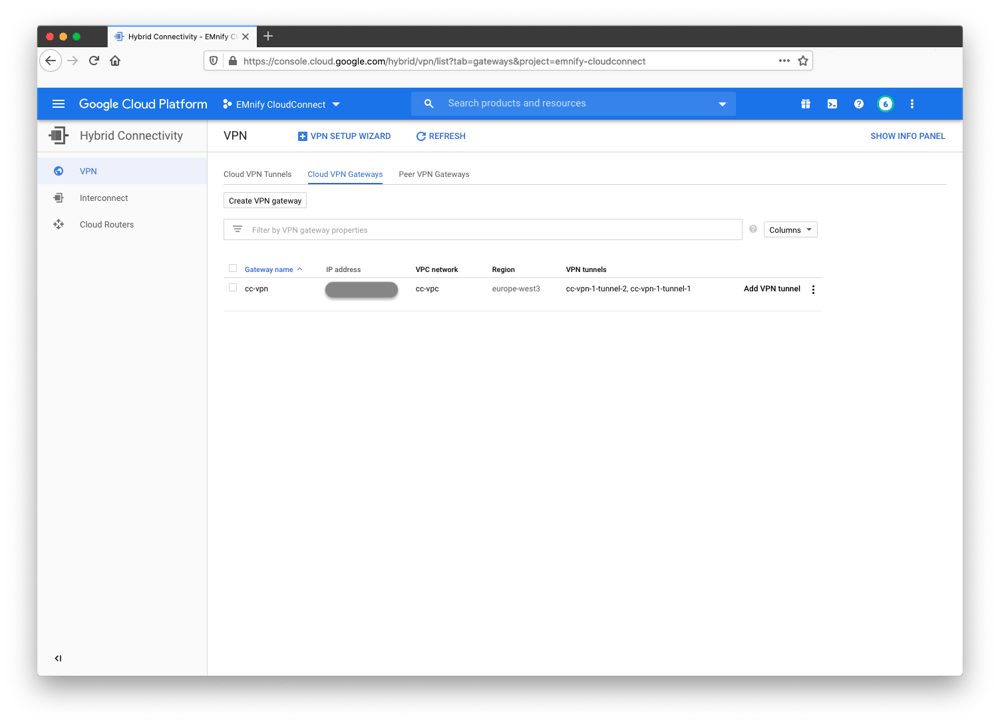
Additionally, the Cloud VPN Tunnels should show a green checkmark and be listed as Established:

After the connection is established, the breakout status in the EMnify CloudConnect panel changes to Active. Tunnel 1 and Tunnel 2 should also change from down to up.
To activate traffic on the VPN, a ticket should be opened towards EMnify support to request activation of the CloudConnect integration.
Routing and Firewall Rules Setup
Resources such as VM instances, instance groups, load balancers, containers which are created in the right subnets (cc-subnet-1 and cc-subnet-2) will have CloudConnect connectivity once route table entries and firewall rules are set up. To create firewall rules in the Google Cloud Console:
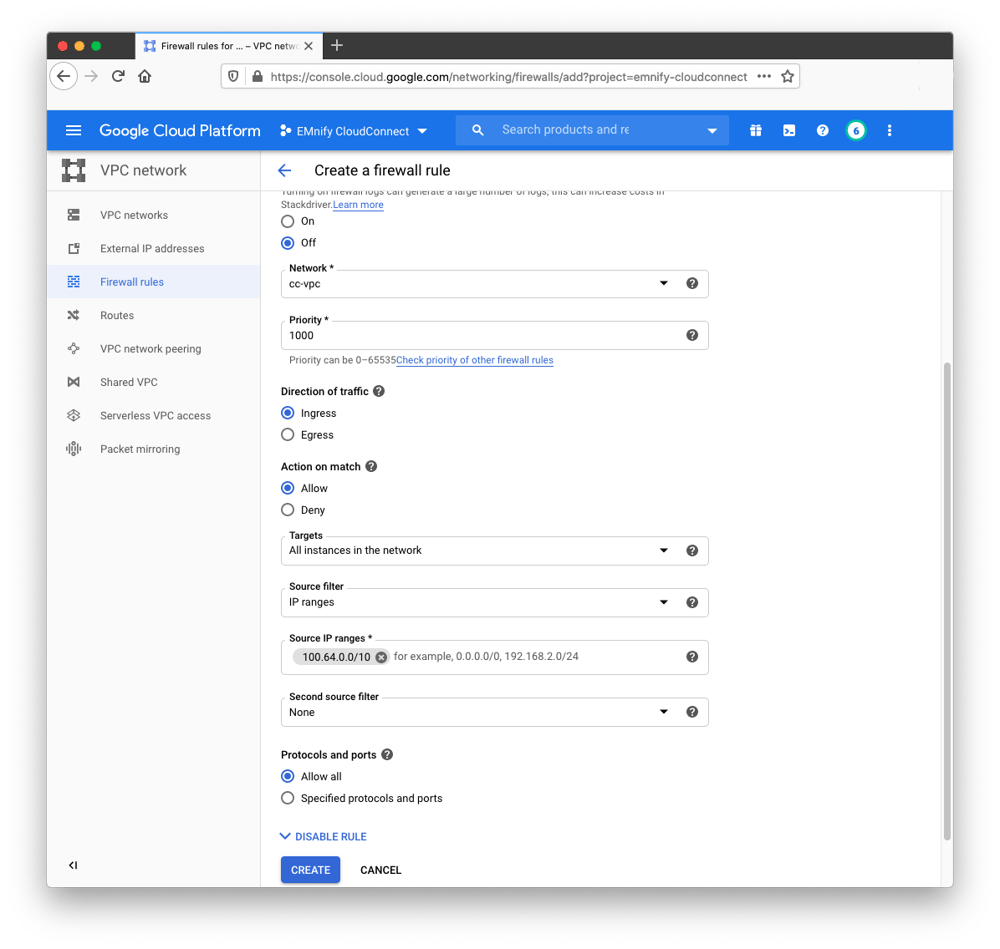
- Navigate to VPC network -> Firewall rules and click + Create Firewall Rule
- Give it a name like cc-allow-from-endpoints, choose cc-vpc as the Network, and for Targets select the rule to apply to “All instances in the network”.
- Specify the Source IP ranges with a value like 100.64.0.0/10. We recommend using a larger IP address range so that we do not have to update the firewall rule in case new endpoint IP address ranges are allocated in the future.
- Select Allow all in the “Protocols and ports” section. Depending on the specific application, the firewall rule can be made protocol-specific and/or port-specific.
- Click Create to finish setup of the CloudConnect attachment.
 After successfully creating the firewall rule, routes should be added automatically and can be confirmed by navigating to VPC Network -> Routes:
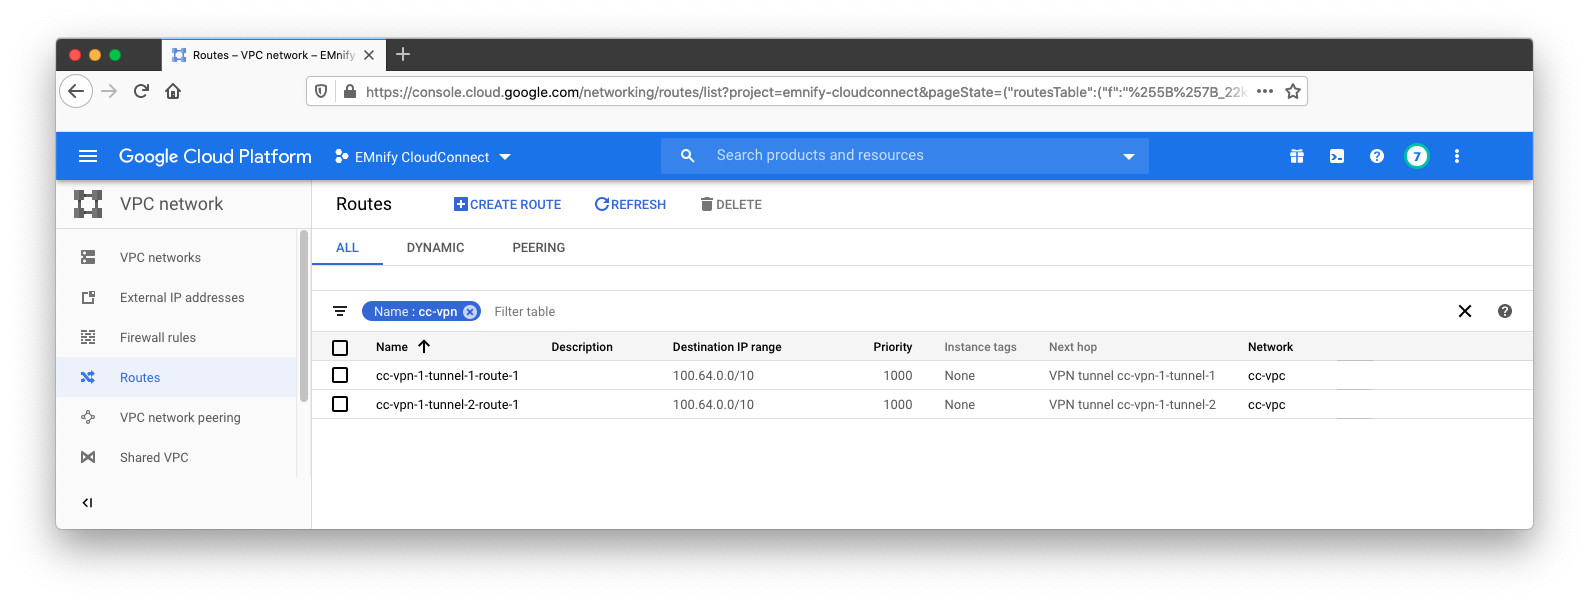

emnify
The content team of emnify is specialized in all things IoT. Feel free to reach out to us if you have any question.