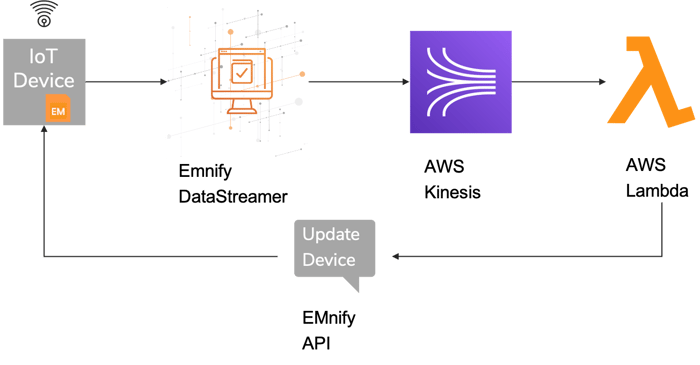
In the world of IoT device management, going Serverless takes care of most of the hassle of doing it yourself. How would you feel if your application could tell your tracking device to update when it would be the cheapest to do so? How about telling your device to send data less frequently when it is connected to a network with expensive data rates? I will show you how to do exactly that. In this post, I will explain how to manage your devices using the emnify Data Streamer, AWS Kinesis and AWS Lambda.
In March 2021, we had one of our regular emnify Squad Summits and this time around, the format was that of an internal hackathon. All our squads hacked together for 2 days to come up with interesting solutions for our customers that they can use with existing emnify services. One such solution was to automate the device firmware update process.
Use Case
Consider this scenario: you have a fleet of devices which are traveling around the world, sending data to you, and you need to roll out a firmware upgrade. Now firmware upgrades use up substantial amounts of data, so ideally you will want to do this without going over your data limit and while connected to a network where the data rates are cheaper. Normally, you would have to constantly monitor each device for when it enters a cheaper rate zone. Or, update the device manually when the vehicle comes back to the base. Both of these options are inefficient and waste a lot of time.
Solution
Fortunately, using a combination of emnify services and Serverless Services on AWS, you can automate this process. Not only will you save time and money, but you will also be able to carry out critical updates without a hassle.
We are going to do this in 3 simple steps today.
- Integrate the emnify Data Streamer into the AWS Kinesis
- Create a Lambda function to process events
- Invoke an SMS to your device using the emnify API
Integrate the emnify Data Streamer into the AWS Kinesis
emnify's Multi Cloud Data Streamer provides connectivity metadata to your cloud platform in real-time for detailed insights on events or usage data of your devices. This stream polls data so that you don't have to make several API calls to get this data from your connected devices. There are various ways you can consume the Data Streamer. One such way is to integrate it into the AWS Kinesis. If you already know how to integrate the Data Streamer into AWS Kinesis, you can jump to Step 2. If not, go to our DataStreamer and Kinesis integration guide and then come back here.
Make sure to select the Create PDP Context or Update PDP Context events only.
Create a Lambda function to process events
Once you have the data into Kinesis, you will see that there are a variety of events that your devices send. In this step, we will read the data coming into the Kinesis and process it in our lambda function. Let's start with creating a simple lambda function.
Create Lambda function
- Log into your AWS management console > Services > IAM > Roles > Create role
- Select the use case Lambda. For the policy, use the policy
AWSLambdaKinesisExecutionRole. Click next, give an appropriate name to the role and create the role.
- Click on Services > Lambda > Create function.
- Give it a function name > Runtime Python 3.8 > Permissions > Use an existing role > use the role you created in the second step
Prepare your Lambda function
Once you are in the Lambda function, you need to do a couple of steps before we start writing our code. This is because, we are going to use the requests module in python. Currently for some reason AWS Lambda does not let you import the module directly. We are going to use a work around for this. If you are reading from the future and if the requests module issue is fixed in AWS Lambda, you can skip this part.
To be able to use the requests module in your code, on your desktop, create a folder called myLambdaFunction. Honestly you can name it anything you want :P . Now, open your terminal and type in the below commands.
cd Desktop/myLambdaFunction
touch lambda_function.py
pip install requests -t .
zip -r lambda_function.zip .
Now back in your AWS Lambda console, go to the Code source section and click on Upload from > .zip file > upload the lambda_function.zip file you created on your desktop.
Kinesis as a trigger to the Lambda
To be able to read the Data Streamer data coming into the Kinesis, you need to connect the two. To do this, in your Lambda console, go to Function overview > Click on Add trigger > Select a trigger > Kinesis > select the Kinesis stream you created to read in the DataStreamer > Add
You have successfully added the Kinesis stream to the lambda. 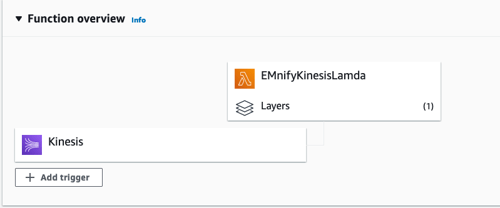
Processing events
The Data Streamer streams a variety of meta data. There are usage data logs and there are events. To get a full list of all event types, check out our documentation. For this example, we are interested in the event type 3:
Create PDP Context
    {
        "id": 16632955564,
        "timestamp": "2021-04-20T19:46:01",
        "event_source": {
            "id": 0,
            "description": "Network"
        },
        "event_severity": {
            "id": 0,
            "description": "INFO"
        },
        "event_type": {
            "id": 3,
            "description": "Create PDP Context"
        },
        "organisation": {
            "id": 1234,
            "name": "EMnify Demo"
        },
        "user": None,
        "alert": False,
        "description": "New PDP Context successfully activated with SGSN CP=193.**.***.***, DP=193.**.***.***.",
        "endpoint": {
            "id": 10000001,
            "name": "Test Device 10 ",
            "ip_address": "10.***.**.**",
            "tags": None,
            "imei": "860813*******498"
        },
        "sim": {
            "id": 908739,
            "iccid": "89883030*******5310",
            "msisdn": "42366********70",
            "production_date": "2018-04-10T11:33:27"
        },
        "imsi": {
            "id": 1941604,
            "imsi": "29505*****03330",
            "import_date": "2018-04-10T11:33:27"
        },
        "detail": {
            "pdp_context": {
                "apn": "em.mnc005.mcc295.gprs",
                "ci": None,
                "ggsn_control_plane_ip_address": "1**.**.***.0",
                "gtp_version": 2,
                "operator_id": "2",
                "lac": None,
                "imeisv": "86081*******0498",
                "sac": None,
                "breakout_ip": "**.***.***.**",
                "mcc": "***",
                "ggsn_data_plane_ip_address": "***.**.***.**",
                "ratezone_id": "3398",
                "imsi": "2950*******3330",
                "rx_teid": 24440804,
                "tariff_profile_id": "389988",
                "tunnel_created": "2021-04-20T19:46:01",
                "nsapi": 5,
                "tx_teid_control_plane": 129841775,
                "mnc": "01",
                "tariff_id": "557",
                "region": "eu-west-1",
                "tx_teid_data_plane": 129841775,
                "sgsn_control_plane_ip_address": "***.***.***.***",
                "rat_type": 6,
                "pdp_context_id": 24440804,
                "sgsn_data_plane_ip_address": "***.***.***.***",
                "ue_ip_address": "**.**.**.**",
                "rac": None
            },
            "country": {
                "country_code": "49",
                "id": 74,
                "name": "Germany",
                "mcc": "262",
                "iso_code": "de"
            },
            "id": 2,
            "name": "Telekom"
        }
    }
Events can be distinguished by their event_type id. From this event, we are interested in the fields tariff_profile_id and ratezone_id. These fields tell you the rate plan profile id associated with the device and the id of the rate zone that the device has entered into. You can use this data to check the details of the rate plan profile and find the rate of the data for the given zone by using the emnify API.
You can then make a decision on whether you are connected to a cheaper network.
def lambda_handler(event, context):
# print(event)
global auth_token
for record in event['Records']:
    payload = base64.b64decode(record['kinesis']['data'])
    # print(payload)
    event_data = json.loads(payload)
    device_id = event_data['endpoint']['id']
    if device_id == 10872562: # Selecting a specific device just for demo purposes
        tariff_profile_id = event_data['detail']['pdp_context']['tariff_profile_id']
        ratezone_id = event_data['detail']['pdp_context']['ratezone_id']
Authenticating the EMnify API
The emnify API calls are authenticated by a JSON Web Token (JWT) referred to as an auth_token. To get this auth token, you can either use the login and password which you use to log into the emnify portal, OR you can use an Application token. I am going to use an application token in my example. To get this token,
log into your account in the emnify portal > Integrations > scroll down to Application Tokens > ADD TOKEN > copy the token
We need to use this application token in our lambda function.
So switch back to the lambda console > Configuration > Environment variables > edit
Add the environment variable with key as app_token and value will be the application token you copied from the portal.
In the code, we will start by getting an auth_token using this app_token.
app_token = os.environ['app_token']
response = requests.post("https://cdn.emnify.net/api/v1/authenticate",json={"application_token": app_token})
auth_token = response.json()['auth_token']
This auth_token is valid for 4 hours and can be used to authenticate consecutive API calls made in the next 4 hours.
Checking data rates
With the tariff profile Id and the ratezone Id, you can check the rate by calling the get tariff_profile_id endpoint of the EMnify API. The rate divided by the volume should give you the data rate.
def get_tariff_profile(tariff_profile_id,ratezone_id):
# Get the tariff_profile
tariff_headers = {
    "accept":"application/json",
    "Authorization": "Bearer {}".format(auth_token)
}
tariff_profile = requests.get(uri+tariff_profile_path.format("389988"),headers=tariff_headers).json()

ratezone = tariff_profile['ratezone']

for i in range(len(ratezone)):
    if  not ratezone[i]["customRate"]:
        rate = ratezone[i]["rate"][0]
        reg_ratezone_id = rate['ratezone_id']
        if(reg_ratezone_id==ratezone_id):
            reg_rate = rate['rate']
            volume = rate['volume']
            return(float(reg_rate)/float(volume))
            # print("rate for:",i,reg_ratezone_id,reg_rate)
    else:
        customRate = ratezone[i]["customRate"][0]
        custom_ratezone_id = customRate['ratezone_id']
        if(custom_ratezone_id==ratezone_id):
            custom_rate = customRate['rate']
            volume = customRate['volume']
            return(float(custom_rate)/float(volume))
            # print("Custom rate for : ",i,custom_ratezone_id,custom_rate)
Sending an SMS
Once you have decided that the network you have entered is cheaper and you want to initiate a firmware upgrade, you can send an SMS to your device. This can be done with a simple call to the emnify API. Sending an SMS is just a way to demo this solution. You can alternatively send a message to the device over a topic through a MQTT broker.
To send the SMS, we are going to use the /api/v1/endpoint/ENDPOINT_ID/sms endpoint.
def send_sms(device_id):
sms_source = "1234567890" #source of the sms being sent
body = "".format(sms_source,device_id)
headers = {
    "accept":"*/*",
    "Authorization": "Bearer {}".format(auth_token)
}
response = requests.post(uri+sms_path.format(device_id),headers= headers,data=body)
# print(response.status_code)
Here the source_address is the number of the sender of the SMS. You can use a number which is authorized to send SMSs to your device. The device_id is the id of the device you want to send the message to. You can get this id from all the events sent through the DataStreamer as well as from the emnify EUI.
You can then send an SMS that triggers the firmware upgrade. You can also use this code snippet to reduce the frequency of sending data if your device is connected to an expensive network.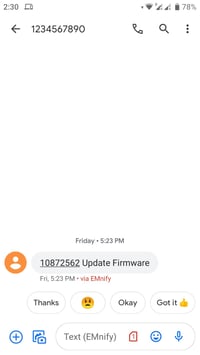
Here's the entire code for the lambda.
import base64
import requests
import json
import os


# Global variable for application_token
app_token = os.environ['app_token']


uri = "https://cdn.emnify.net"
auth_path = "/api/v1/authenticate"
sms_path = "/api/v1/endpoint/{}/sms"
tariff_profile_path = "/api/v1/tariff_profile/{}"

#Global variable for authentication token
auth_token =  requests.post(uri+auth_path,json={"application_token": app_token}).json()['auth_token']


def lambda_handler(event, context):
    # print(event)
    global auth_token
    for record in event['Records']:
        payload = base64.b64decode(record['kinesis']['data'])
        # print(payload)
        event_data = json.loads(payload)
        device_id = event_data['endpoint']['id']
        if device_id == 10872562: # Selecting a specific device just for demo purposes
            tariff_profile_id = event_data['detail']['pdp_context']['tariff_profile_id']
            ratezone_id = event_data['detail']['pdp_context']['ratezone_id']
            # Check data rate rate
            data_rate = get_tariff_profile(tariff_profile_id,ratezone_id)
            print("Data rate for your current ratezone is: ",data_rate)
            # If the rate is a cheaper than/ equal to €0.10/MB, send an SMS to update firmware
            if(data_rate<=0.1):
                send_sms(device_id)


def get_tariff_profile(tariff_profile_id,ratezone_id):
    # Get the tariff_profile
    tariff_headers = {
        "accept":"application/json",
        "Authorization": "Bearer {}".format(auth_token)
    }
    tariff_profile = requests.get(uri+tariff_profile_path.format("389988"),headers=tariff_headers).json()
    # print(tariff_profile)
    ratezone = tariff_profile['ratezone']
    # print(ratezone)
    for i in range(len(ratezone)):
        if  not ratezone[i]["customRate"]:
            rate = ratezone[i]["rate"][0]
            reg_ratezone_id = rate['ratezone_id']
            if(reg_ratezone_id==ratezone_id):
                reg_rate = rate['rate']
                volume = rate['volume']
                return(float(reg_rate)/float(volume))
                # print("rate for:",i,reg_ratezone_id,reg_rate)
        else:
            customRate = ratezone[i]["customRate"][0]
            custom_ratezone_id = customRate['ratezone_id']
            if(custom_ratezone_id==ratezone_id):
                custom_rate = customRate['rate']
                volume = customRate['volume']
                return(float(custom_rate)/float(volume))
                # print("Custom rate for : ",i,custom_ratezone_id,custom_rate)


def send_sms(device_id):
    sms_source = "1234567890" #source of the sms being sent
    body = "".format(sms_source,device_id)
    headers = {
        "accept":"*/*",
        "Authorization": "Bearer {}".format(auth_token)
    }
    response = requests.post(uri+sms_path.format(device_id),headers= headers,data=body)
    # print(response.status_code)
And you are done. Get yourselves emn trial SIM cards with a Free Sign Up which come with a prepaid balance of €10 and test this code.
Stay connected!

Shruti Kuber
Shruti Kuber is a Developer Advocate and Community Manager at emnify.