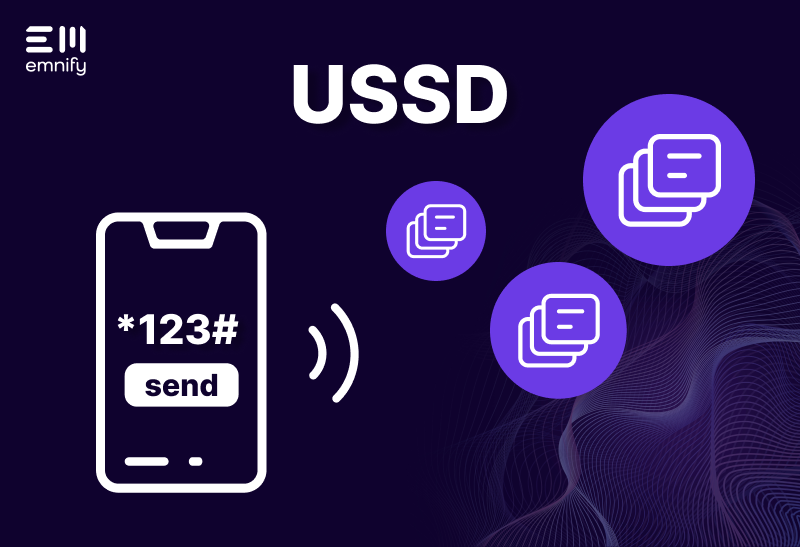
USSD stands for “Unstructured Supplementary Service Data”. It allows the transport of small volumes of data over the signaling channel in a mobile network, however it does not need an active data connection to work, nor does it incur SMS charges.
USSD supports a payload of up to 160 bytes of raw data (or 182 characters if GSM 7-bit character set is used), this makes it a suitable option for sending small amounts of sensor data with minimum implementation effort on an IoT device. Additionally, only a single AT command (AT+CUSD) is needed; the AT command is sent to the GSM Modem, which sends it to the network.
In today’s blog we will describe a full end-2-end setup using the example of a temperature sensor connected to a micro-controller mobile connectivity, we will also look at the core network infrastructure and the application server processing the data.
Hardware Requirements:
- Arduino UNO
- Arduino GSM shield
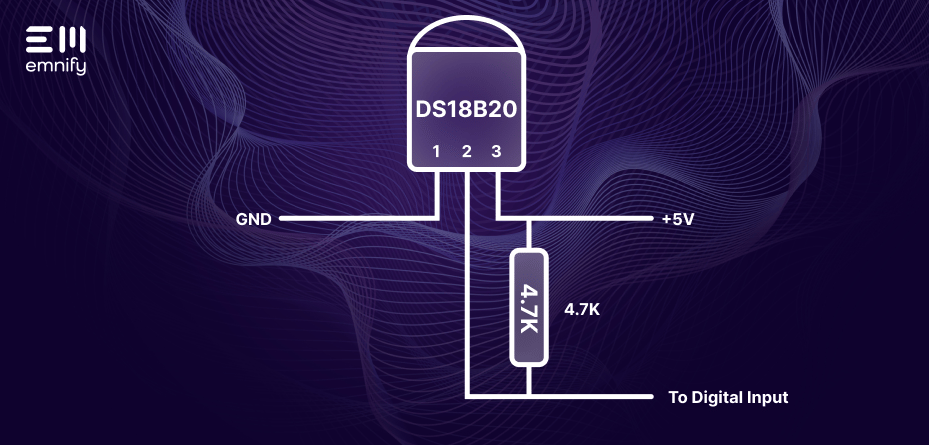
- Digital Temperature Sensor - DS18B20 from Maxim (formerly Dallas)
- 4.7K Ohm Resistor
- Breadboard / Jumpers
- emnify M2M SIM
If you want to rebuild this or something of a similar setup, you will need an active emnify IoT SIM, these provide you connectivity to a USSD Gateway.
Wiring everything together
In this example, we will use a DS18B20 from Maxim (formerly Dallas) for the temperature sensor. This sensor is easy to integrate and supports a “one-wire” bus system so you can connect multiple sensors in a chain together, without wasting additional PINs on your Arduino.
Also it comes with a library for the Arduino, so using it from a sketch is straightforward. You can download the library here
Once downloaded you should find two folders “DallasTemperature” and “OneWire”, so drop both into your Arduino/Libraries folder.
- The DS18B20 can be connected in a simple two-wire mode: Connect both the GND and VDD pins to 0V
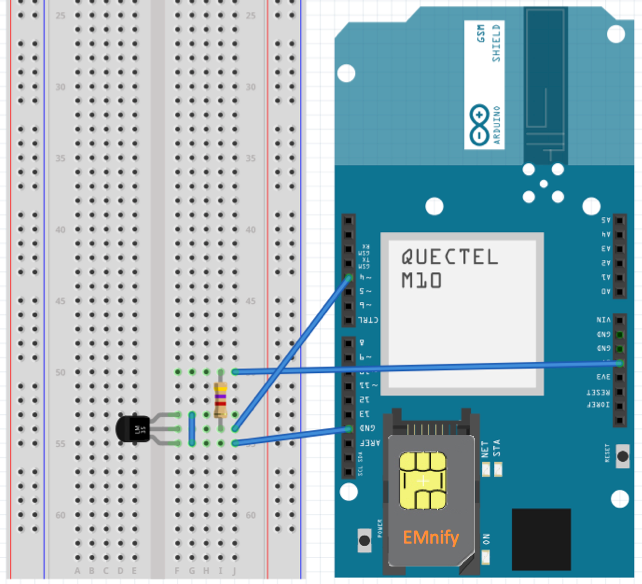
- Connect the DQ PIN to PIN 4 on the Arduino board (or in our case to the GSM shield which we will have mounted on top of our Arduino.)
- The GSM shield will use PINs 2 and 3 for RX and TX to communicate with the Arduino.
- Lastly, insert the emnify M2M SIM into the SIM slot on the GSM shield.
See below diagram as a visual aid for the above steps:
Understanding the network architecture
Every emnify M2M SIM is connected through emnify’s Virtualized Core Network, EMcore. This provides users their own virtual mobile network, including a private USSD gateway. This means there is no limit on available USSD codes and routing to an application server is freely configurable by the user.
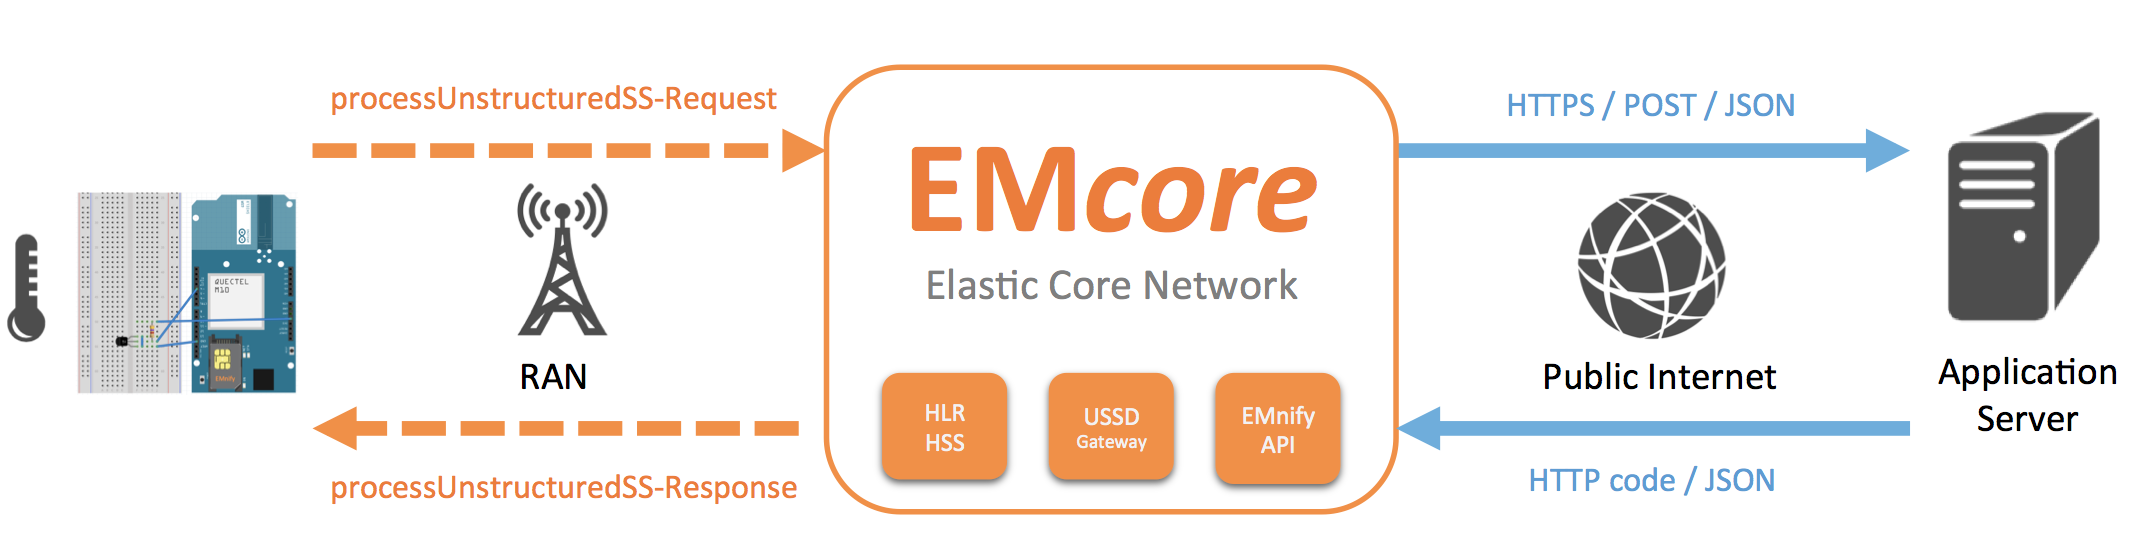
The emnify USSD Gateway implements a RestAPI to forward SS-requests from the device to an application server via HTTP. The RestAPI also transports the USSD string encapsulated in JSON.
The application server may also respond with JSON content, which is then transferred back to the device. The dialog may be continued in this way or any of the parties may close the dialog at any time.
You can find a detailed description of the message flows and data objects in the emnify USSD Integration Guide.
Programming the microcontroller
For testing we will implement a simple program running on the Arduino with the following flow:
- Initialize serial connection to GSM Module
- Initialize sensor
- Get sensor temperature
- Assemble AT command with USSD string
- Send AT command to GSM Module
- Read response from GSM Module
- Go to sleep and then repeat this procedure
You can find the complete code in our GitHub repository.
Include the needed libraries and define PIN layout
We will only need to include the Software Serial libraries to communicate with the GSM shield because only a plain AT command is needed to send a USSD request, no special GSM libraries need to be loaded.
In order to work with the “one-wire” bus and the DS18B20 temp sensor we need to include OneWire.h and DallasTemperture.h.
#include <SoftwareSerial.h>

#include <OneWire.h>

#include <DallasTemperature.h>
// GSM shield connected to PINs 2 (RX) and 3 (TX)
SoftwareSerial gsmSerial(2, 3);
// DS18B20 data wire connected to PIN 4
#define ONE_WIRE_BUS 4
// Setup oneWire instance
OneWire oneWire(ONE_WIRE_BUS);
// Pass oneWire reference to Dallas Temperature library
DallasTemperature sensors(&oneWire);
// use LED on PIN 13 as control lamp
int led = 13;
Setup
In the setup routine, configure the serial terminal connection via USB to 9600 baud so that you can see some debugging output when the Arduino is connected to your development environment. Also, we configure the serial connection to the GSM shields to 9600 baud and initialize the sensor library with a sensor.begin() function call.
For convenience, we use PIN 13 as a control lamp. If you want to, you can connect an external LED to it.
void setup()

{

Serial.begin(9600);
while (!Serial) {
; // wait for serial port to connect
}
Serial.println("Temp Monitor initializing");
pinMode(led, OUTPUT);
digitalWrite(led, HIGH);
gsmSerial.begin(9600);
sensors.begin();
digitalWrite(led, LOW);
}
Main Loop
In the main loop, you will request the temperatures from all connected sensors on the one-wire bus. As there is only one sensor connected in our example hardware layout, we will get the temperature from the sensor with index 0 with sensors.getTempCByIndex(0).
After that, we need to assemble the AT command to send the USSD request, the required format is:
AT+CUSD=1,”*100*temp=37.00#”
To achieve that we link together the prepared strings and insert the temp value as a string using the dtostrf() function.
After that we need to send the AT command to the GSM module by using a gsmSerial.println(atCommand) command.
char atCommand[100];

char atUssd[32]="AT+CUSD=1,\"";

char ussdPrefix[32]="*100*temp=";

char ussdSuffix[3]="#\"";

char tempStr[23];
void loop()
{
int charsReceived;
float temp;
Serial.print("Requesting temperatures...");
sensors.requestTemperatures();
Serial.println("Done");
Serial.print("Temperature for Device 1 is: ");
temp = sensors.getTempCByIndex(0);
Serial.println(temp);
// compose AT command with USSD string
strcpy(atCommand, atUssd);
strcat(atCommand, ussdPrefix);
dtostrf(temp, 2, 2, tempStr);
strcat(atCommand, tempStr);
strcat(atCommand, ussdSuffix);
// send AT command
Serial.println("Sending USSD Request");
gsmSerial.println(atCommand);
delay(2000);
while (!(charsReceived = gsmSerial.available()))
{
digitalWrite(led, HIGH);
delay(100);
digitalWrite(led, LOW);
delay(100);
}
for (;charsReceived > 0;charsReceived--)
{
Serial.write(gsmSerial.read());
delay(50);
}
Serial.println("");
Serial.println("Done");
Serial.println("Sleeping 120 secs");
delay(120000);
}
Processing the data on the application server
Once you fire up the Arduino you will see HTTP POST requests coming to the application server carrying the USSD string as JSON data:
POST www.myserver.com/storeTemperature.php
{
"ussd-begin": {
  "endpoint": {
    "id": 1,
    "name": "Weather station"
   },
  "message": {
    "encoding": "default",
    "body": "*100*temp=37.00#"
  },
  "session-id": "b5136456-d18d-4605-a79d-8464cc9fabc1"
  }
}
On the server you can choose any implementation framework that allows easy processing of JSON data, e.g. PHP, NodeJS or Java. Once the server software extracts the temperature value it can store the information in a database or forward it to another service.
After receiving the request, the application server may respond with a plain HTTP code 200, the dialog will then be closed. Alternately, you can continue the dialog by providing a JSON response with a USSD string that will be sent to the device.
Summary
If your use case requires only small volumes of data to be communicated at regular timeframes of a few minutes or hours, then USSD is a viable alternative to SMS or data connectivity. The emnify platform provides users with their own virtual USSD gateway instance enabling them with full control of the USSD codes and the routing. This also provides isolation from other subscribers using the same mobile network.
Sign-up for a user account, free of charge, on the emnify platform and order your first USSD-enabled M2M SIM today. Additionally, if you have any questions relating to USSD services and how this may work for your business, please contact us. Our team is always happy to help and offer advice.
You can also sign up to our newsletter to keep up with the latest news and insights.

Christian Henke
Want to get a better sense of how emnify's customers are using the platform? Christian is your go-to. As Head of Product at emnify, he leads the development of a reliable and secure mobile network built for IoT businesses.